As NFTs continue to be adopted by some of the biggest brands in the world, many people are curious to know how to buy an NFT. Of course, buying an NFT as a beginner is not as easy as you might think.
To buy an NFT, first, open an exchange account to buy cryptocurrency. Then, set up your wallet to store your crypto and NFTs. Next, transfer crypto to your wallet and choose a marketplace before researching the NFTs you want to buy. Finally, make your purchase.
If that all seems overwhelming, don’t worry. Follow these six simple steps below to successfully buy your own NFT.
1. Open an Exchange Account to Buy Cryptocurrency
The first step to buying an NFT is to open your own account on a crypto exchange to buy some cryptocurrency. Crypto is the prime currency used to buy NFTs.
More specifically, Ethereum (ETH) is the preferred choice of cryptocurrency for a majority of NFTs that are sold.
One of the most trusted and popular crypto exchanges in the world is Coinbase.
Coinbase secures your cash on FDIC-secured accounts, lets you safely connect and trade crypto using your bank account, and blocks suspicious accounts to ensure your safety.
With more than 89 million users (and growing), supporting more than 100 countries, Coinbase is my go-to exchange for buying crypto.
Keep in mind that there are other blockchains used for buying NFTs such as Tezos and Bitcoin, however, Ethereum remains the preferred choice amongst both creators and consumers.
That’s why you’ll likely want to buy ETH for buying your NFT.
To set up your Coinbase account, follow the instructions below:
Step 1: Create a Coinbase account
Download the Coinbase app or go to the website to start the signup process. You will need a valid ID and may be asked for proof of address in order to transact, so be sure you have those ready.
Verifying your ID may take longer than a few minutes, depending on where you live.
Step 2: Add your payment method
Tap on the payment method box and connect your preferred payment method. You can use your bank account, debit card, or initiate a wire transfer.
Step 3: Start a trade
You can search for the cryptocurrency you want by choosing the Buy button. For NFTs, you will want to buy ETH.
Step 4: Select Ethereum from the list of assets
Search for $ETH by typing “Ethereum” into the search bar. When you see Ethereum show up in the results, tap it to open up the purchase screen.
Step 5: Enter how much you want to buy
Use the keypad to enter the amount you want to spend in your local currency. The app will automatically convert that into the currency amount in $ETH.
Step 6: Finalize your purchase
Tap “Preview buy” when you’re ready. You’ll be shown the details of your purchase.
Make sure everything looks good and then confirm your purchase. That’s it, you’ve successfully bought $ETH.
In order to use $ETH to buy an NFT, you’re going to need to transfer it from Coinbase to your wallet. This wallet is your key to accessing the Ethereum blockchain to buy NFTs.
2. Set Up Your Wallet to Store Crypto and NFTs
Your wallet is your key to unlocking the blockchain where all NFTs are bought and sold.
Your wallet is not only used to store your crypto and NFTs but it’s also used to connect the NFT marketplaces to make your purchase. If you don’t have a wallet, you can’t own an NFT.
Contrary to popular belief, crypto and NFTs aren’t actually stored in your wallet, they are stored on the blockchain. Your wallet is simply how you access your specific address on the blockchain.
Similar to how your money isn’t actually stored on your phone, you still use your phone to access your bank account where your cash is really stored.
Now that we have that clear, let’s talk about the two different types of wallets.
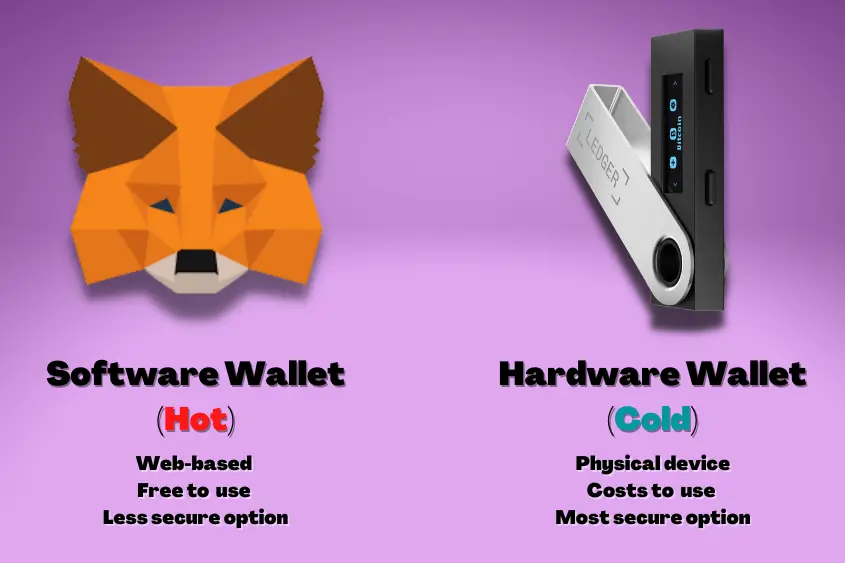
There is a software wallet (hot wallet) and a hardware wallet (cold wallet). Both of these types of wallets can be used to buy an NFT, but they each have their pros and cons.
Software Wallet (hot wallet)
- Software wallet, web-based
- Free to download and use
- Can appear as a desktop app, in-browser extension, or both
- Convenient and simple to access through websites and apps
- More vulnerable to cyber-attacks than cold wallets
The two most trusted software wallets are Coinbase Wallet and Metamask. Both of these wallets offer the same functions when it comes to your digital assets. Ultimately, it comes down to preference.
Personally, I use Metamask since that is the wallet that I was introduced to first. You can learn how to set up your Metamask wallet here.
Hardware Wallet (cold wallet)
- Hardware wallet, physical device
- Most secure option for storing crypto and NFTs
- You have to buy a hardware wallet
- Not as convenient as a software wallet
- Less vulnerable to cyber-attacks because all its data is stored offline
The only two hardware wallets I trust and would recommend are Ledger and Trezor. Other brands I can’t comment on due to my lack of experience with them. (Are there even any other brands?)
If you are serious about safely storing your NFTs, then you need to get a hardware wallet. Period.
A software wallet is great if you’re just starting out. But if you plan on storing your NFT long-term or if you have a significant amount of crypto, I highly recommend you get yourself one of these wallets.
You can learn more about the best wallets for safely storing your NFTs in this comprehensive guide I created.
Important note: Upon setting up both a software wallet and hardware wallet, you will receive a secret recovery phrase. This phrase is usually 12, 18, or 24 randomized words that are used to access your wallet.
Never, under any circumstances, share this phrase with anyone. This phrase is literally the key to your wallet and the assets within. If you lose it, there’s no recovering your wallet or your assets.
3. Transfer Crypto to Your Wallet
Once you have created your account on a crypto exchange such as Coinbase and purchased some ETH, it’s time to transfer it to your wallet.
Transferring ETH to both a hot wallet like Metamask and a cold wallet, like Ledger, is virtually the same process.
For this example, I am going to use Metamask. Below are the steps to transfer your ETH to your wallet.
Step 1: In your Metamask Wallet, click Recieve, to copy your address.
First, you need to copy your wallet address. To do this, sign in to your wallet and click “Receive”.
This will reveal your public wallet address. Your address is 42-characters and will start with “0x”. Use this address anytime your transfer crypto or NFTs to your wallet.
Step 2: Sign in to your Coinbase account.
Sign in to your Coinbase account to initiate the transfer of ETH to your wallet.
Step 3: In Coinbase, click Send, choose $ETH, then enter the amount you wish to send.
Navigate to the top of your account and click the Send/Receive button. Then, choose the amount of ETH you want to send to your MetaMask wallet and make sure to select pay with Ethereum.
Step 4: Input the recipient (your Metamask wallet address).
Remember that address you copied earlier from your wallet? You want to paste that into the recipient section now. You can choose to add a note if you want, but it’s not necessary.
Step 5: Click Continue/Send Now. Verify received funds by checking your Metamask wallet (it can take a few minutes).
Click Continue to review your transfer. Once you have confirmed the transfer looks good, tap Send Now. You can verify you have received your funds by signing in to your wallet.
Note: You have to pay a network fee to send ETH from Coinbase (an exchange) to MetaMask (the blockchain). This fee varies based on network usage and is not determined by Coinbase.
It can take up to 10 minutes or more to receive your ETH into your MetaMask wallet.
4. Choose a Marketplace
Once your wallet is loaded with ETH, you’re ready to choose an NFT marketplace to purchase your NFT.
Choosing a marketplace can be quite overwhelming considering there are several options.

Before we get into specific marketplaces you can begin exploring, allow me to explain the three common types of marketplaces.
- Open marketplace – The supermarket of NFTs where anyone can buy, sell, and create their own NFTs. These marketplaces offer every kind of NFT. From the most sought-after blue chips like VeeFriends, to low-effort assets made in someone’s basement.
- Closed marketplace – These more premium marketplaces offer exclusive works of digital art. Although creators have to go through an extensive application process before being accepted, anyone can buy premium NFTs from these closed marketplaces.
- Proprietary marketplace – These marketplaces sell NFTs that are trademarked or copyrighted by the company that’s operating it.
To browse a marketplace, you don’t generally have to sign in using your wallet. You only have to sign in once you’re ready to buy an NFT.
Here are some of the best marketplaces to buy NFTs:
| NFT Marketplace | Type of Marketplace | Pros & Cons |
|---|---|---|
| Opensea | Open | Pros: Largest and most popular marketplace. Cons: Due to its popularity, there’s a lot of junk and replicas. |
| Rarible | Open | Pros: Has been around since 2020. Offers a large variety. Cons: Remains an underdog in the NFT space |
| Nifty Gateway | Closed | Pros: Exclusive art NFTs that you can buy using fiat or ETH. Cons: NFTs tend to be more expensive since they’re premium quality. |
| Coinbase NFT | Open | Pros: A prime focus on social elements. Zero marketplace fees for a limited time. Cons: The platform is new (still in beta). |
| SoRare | Proprietary | Pros: One of the only fantasy football NFT platforms. MLB is soon to be integrated. Cons: If you don’t like sports or games, this is not the platform for you. |
| Foundation | Closed | Pros: Curated and limited NFTs. Community-driven. Offers premium artwork. Cons: Limited and exclusive creator list with high fees. |
| SuperRare | Closed | Pros: Curated and rare digital artwork with a fine gallery vibe. Cons: High fees and pricier NFTs. |
| Makersplace | Closed | Pros: NFTs from established artists. Each NFT is digitally signed and issued by the creator. Cons: Premium prices and higher fees. |
| Mintable | Open | Pros: Normal, gasless, and printable items. You can buy NFTs using fiat or crypto. Ideal for novice users. Cons: Fees can be high depending on which mint option you choose. |
| LooksRare | Open | Pros: Offers a nice selection of NFTs including blue chips. Cons: It’s rather new compared to Opensea. |
| Lazy | Open | Pros: Easily display your collection of NFTs with a simple user interface. Cons: Lazy is more of a showcasing platform than a marketplace. |
| Known Origin | Closed | Pros: Digitally signed certificate to go with each NFT. Partnered with eBay. Cons: High fees with a limited selection of NFTs. |
I know… There are a ton of potential marketplaces to choose from and the list only continues to grow.
If you are curious to learn more about how each marketplace operates, what you can expect, and their associated fees, make sure to check my comprehensive guide to the best marketplaces for buying NFTs.
5. Research the NFT You Want to Buy
So, you finally found an NFT you want to purchase and you’re ready to buy it right now.
But, WAIT, there’s more. You need to research the NFT you’re considering spending your hard-earned money on.

You wouldn’t buy a used car without doing some research first, would you? I hope not.
NFTs should be treated in a similar manner. Just like you might take a used car to a mechanic to have it inspected, you should be the mechanic of your potential NFT purchase.
It’s easy to get overly excited about buying an NFT and instantly pull the trigger. But, you might end up regretting it if you don’t first do your own research.
Here are some things I recommend researching before buying an NFT.
- Brand/creator(s) – Ultimately you’re buying an NFT from a creator. Generally, if someone creates something and offers it for sale, you could assume they have a brand. Just because someone has a brand doesn’t mean it’s good or that the person’s intentions are good. Find out who you’re dealing with.
- Reputation/past accomplishments of the creator(s) – Getting to know someone also includes learning about their past. Have they been successful in other realms? If they weren’t successful, did they at least end whatever it was on good terms? Or, did they go out tearing others down? A person’s past can tell you a lot about how they might perform in the future.
- The community – The community is one of the best ways to determine if an NFT project/brand is a good buy. Just like you read the reviews before buying a product on Amazon, you need to see what others are saying about the NFT you are considering purchasing. If there is an overall negative outlook from the community and little engagement from the brand, this is usually a red flag.
- Utility – What do you get with the purchase of the NFT? Is it a physical product, access to an event, or some other perk that excites you? Make sure the initial utility is worth the price you’re paying. If you’re simply buying a digital piece of art, then focus on how well the artist is building their brand and engaging with their community, as they might not offer much utility beyond the artwork itself.
After doing the recommended minimum of 50 hours worth of research on an NFT, then you can move forward with your purchase.
If you have any pressing questions before your purchase, however, make sure to find the answer first.
6. Make Your Purchase
The time has come. You’ve put in the work and you’ve learned so much about the NFT, your brain is ready to burst. Now it’s time to make your purchase.
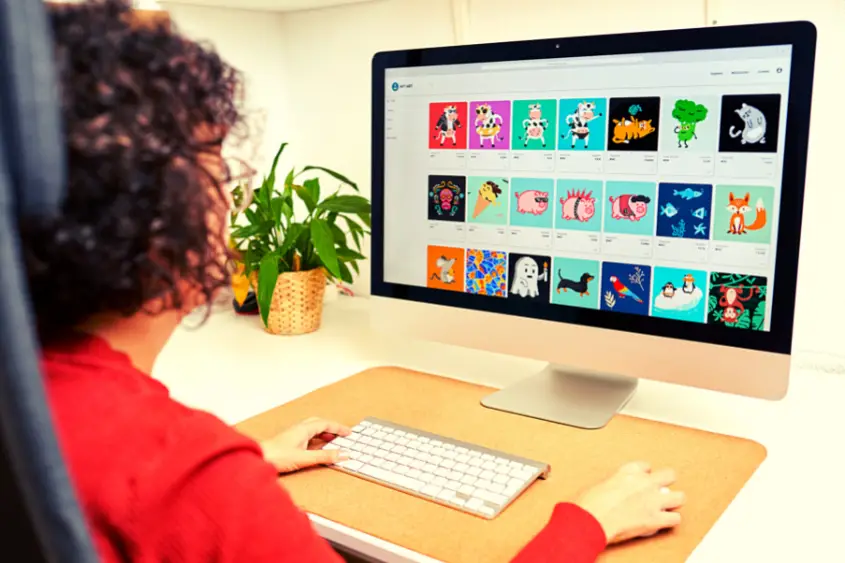
But wait, there’s still more! There are a couple of things to be aware of before purchasing your NFT. Gas fees and marketplace fees.
Gas fees – Occur every time you submit a transaction on the blockchain. These fees are not decided by the marketplace, but rather by how congested the blockchain is.
If a lot of people are transacting at the same time you are, the fee will be higher. A transaction is considered any action that requires something on-chain to happen (buying, selling, creating, bidding, and canceling) all incur this fee.
Gas fees can range anywhere from $5 to over $150. To avoid paying higher gas fees, try transacting early in the morning or late at night when the world is less active.
You can also adjust the gas fee. There are three speeds to choose from: slow, average, and fast. Slow will incur the lowest fee, and fast the highest.
Just know that if you choose the slow option, you risk your transaction not going through, but you still end up paying the gas fee.
I highly recommend choosing the fast option when buying an NFT, especially if the blockchain is busy.
This will ensure your transaction is successful and you get your NFT. To be honest, the fast option doesn’t even cost that much extra.
Generally, you will pay an additional $3 to $20 for the fast option. Well worth it if you ask me.
Marketplace fees – Are fees set by the marketplace to help offset the cost of providing their services.
Marketplace fees often range anywhere from 1% to 10% of the transaction price. Make sure to consider these fees before buying an NFT.
Okay, now you’re ready. Wait, one more thing!
Just kidding, continue onward young grasshopper.
To buy an NFT you will need to connect your wallet to the marketplace you’re transacting on.
To do this, locate the button that says “connect” or find a wallet icon. Once you press the button, multiple wallet options should appear. Choose your wallet and sign the transaction to connect.
After connecting your wallet you can navigate to the NFT you want to buy. From there, you likely have a couple of options depending on the marketplace. You can either Buy Now or Make Offer.
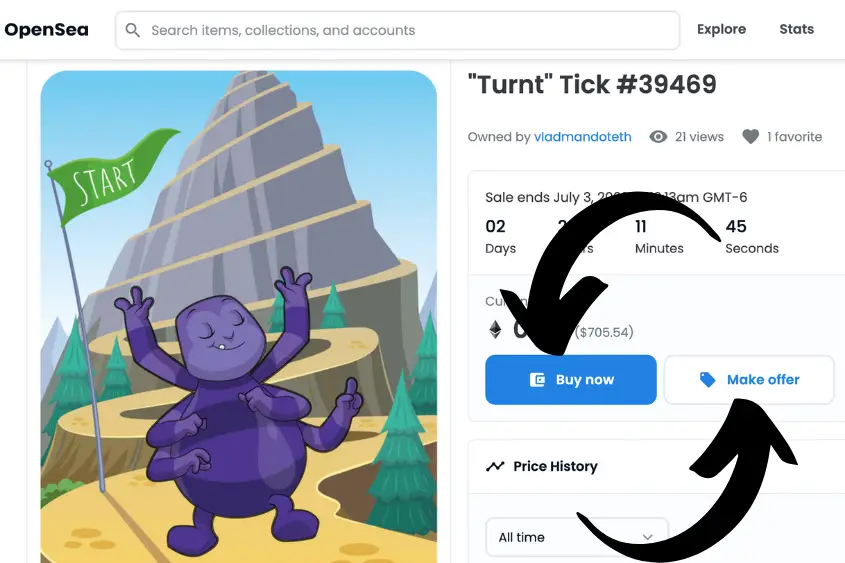
Buy Now – This means you will pay the listed price (plus gas & marketplace fees), and you will receive the NFT instantly. If you aren’t worried about getting a lower price, this is the best option.
Make Offer – Many marketplaces will allow you to bid on an NFT. If you aren’t happy with the listed price or you think the seller might accept a lower offer, submitting an offer might be a good decision.
If the seller likes your offer, they can choose to accept it. Or, sometimes a seller will only list an item that accepts bids that also has a timer.
In this scenario, the buyer who submits the highest offer at the end of the timer will receive the NFT (as long as the offer meets the reserve price).
Note: If you decide to place a bid, the money you bid will be tied up in that offer until it is either accepted or rejected, or you cancel your bid. Also, submitting and canceling a bid will incur a gas and marketplace fee, depending on the platform.
Whether you choose the Buy Now or Bid option, you will have to sign the transaction using your wallet.
The transaction will show you a breakdown of your fees, including the cost of the NFT, marketplace fee, and gas fee. Here is where you can edit your gas fees if you desire, as well.
If everything looks good, confirm the transaction.
It can take anywhere from 15 seconds to 10 plus minutes for your NFT to transfer to your wallet address.
Again, this time varies depending on the speed you choose and the network congestion.
Once you’re done buying your NFT, it’s important to disconnect your wallet from the marketplace.
If you leave it connected, you could be at a higher risk of being hacked. To do this on your computer follow the steps below:
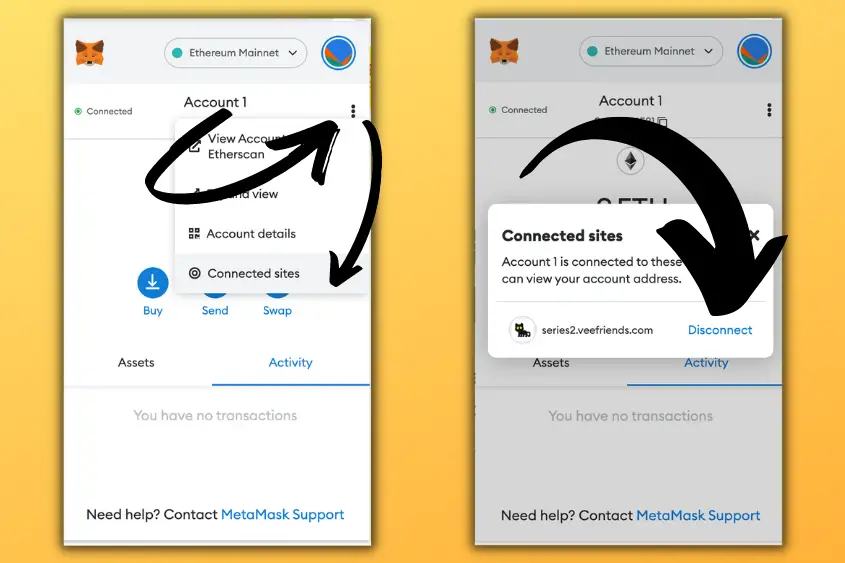
- Within your Account view, click on the 3 dots button on the top right-hand corner.
- In the expanded menu, click on Connected Sites.
- Click on the trash can button next to the site you want to disconnect from.
If you are on your mobile device, you will have to disconnect your wallet using the site you’re connected to.
Usually, to do this you will select the same button you used to connect your wallet to disconnect it.
How to View Your NFT
Viewing your NFT is one of the most satisfying feelings. After all of your hard work, it’s exciting to see it pay off. There are a few ways that you can quickly view your NFT.
You can quickly view your NFTs in your wallet under the assets tab, on your Opensea profile, and on Etherscan.io.
Signing into your wallet is the easiest option for viewing your NFTs, Opensea is a popular choice, and Etherscan is the most accurate option.
Sometimes your NFT can take a while to appear in your wallet, so the next best option is to sign in to your Opensea profile and view it there.
The most accurate option for viewing your NFTs is by using Etherscan – The Ethereum Blockchain Explorer.
Every single transaction that has ever occurred on the Ethereum blockchain can be viewed on Etherscan. This includes your transaction as well as others’.
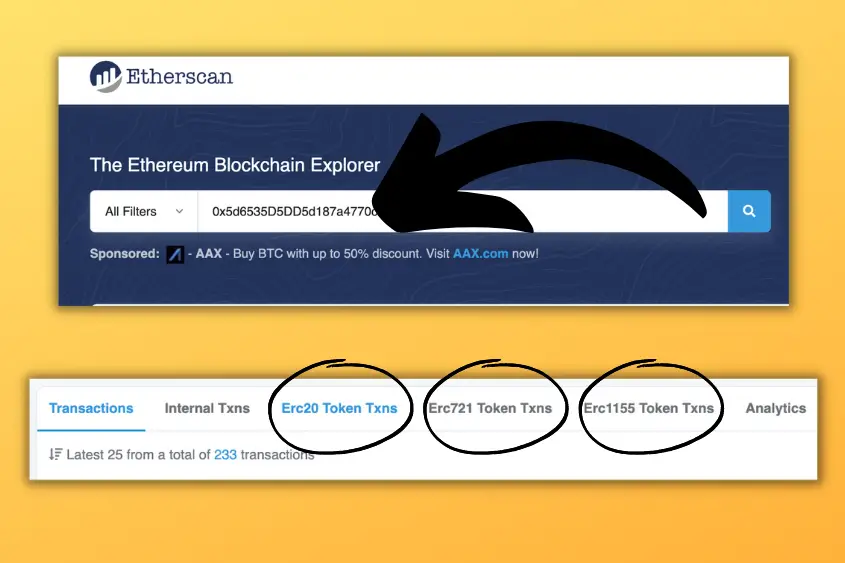
To view your NFTs on Etherscan, copy your public wallet address and paste it into the search bar.
From there, you can view all of your wallet transactions as well as all of your assets, including your NFTs. ERC-20, ERC-1155, and ERC-721 are where you will find your NFTs listed (this just depends on what type of token your asset is).
How Much Does it Cost to Buy an NFT?
The average cost to buy an NFT ranges from $10 to well over $1,000. This does not include gas and marketplace fees. Some popular NFTs such as CryptoPunks were initially given away for free. Ultimately, it depends on how popular the NFT is and whether or not the brand has the demand to back it.
Regardless of how much an NFT costs, the golden rule is to never spend more money than you can afford to lose.
If you have to take out a loan (yes people do this) or risk missing your rent payment to buy an NFT (yikes), then you shouldn’t be buying it.
NFTs are extremely volatile assets and they will continue to be for years to come. There’s no telling how much one will be worth years from now or even tomorrow. Prices fluctuate daily.
That being said, there are some essentials for accessing the price of every NFT you buy. Make sure you are aware of these to make the best possible buying decision.
Tips For Buying NFTs Safely
At the end of the day, buying something as new and as volatile as an NFT can be truly nerve-racking.
There are numerous scams and mistakes that can easily be made if you aren’t aware of what to watch for.
Below are my top tips for buying NFTs safely.
Be aware of scams
Scams are abundant when dealing with NFTs. Wherever there’s money to be made, there are scammers to be found. Staying aware of the top NFT scams is your best defense to avoid them altogether.
Some of the top scams include:
Phishing links – Malicious links and pop-ups advertising new NFT projects and drops on social media platforms. Phishing links are generally sent via DM’s on Discord, Twitter, Instagram, and even WhatsApp. If you receive a DM regarding an NFT drop, a Discord group invite, or any other random links, do not take the bait. Instead, delete the message.
Catfishing – Fake marketplace websites, social media accounts, and celebrity impersonators advertising NFT drops, collections, help desks, and exclusive Discord groups. Catfishing can show up in your DMs, email, and Google Search results.
Impersonators with large followings and verified accounts will often reach out to you via DM. Don’t fall for these scammers.
Additionally, you may receive what looks like an authentic email posing as a help desk or customer service rep from a reputable brand.
Unless you initiated the conversation by submitting a ticket through a trusted source (such as the company’s website), it’s best not to interact with these messages at all.
Furthermore, scammers have been known to buy Google Adwords in order to appear as a top result on Google Search.
These links are identifiable because they will say “Ad” next to them. If you see this, always double-check the URL.
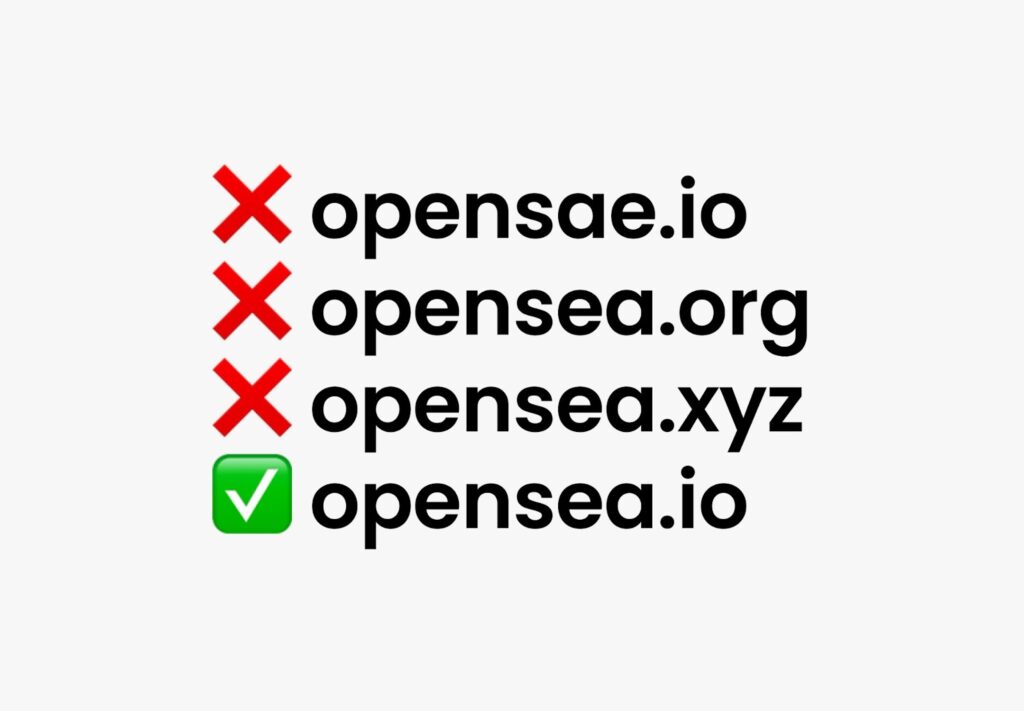
Oftentimes scammers will buy a link that’s similar to the real link.
For example, you might be trying to visit an authentic site like Opensea.io; but the scammer might have paid for a similar URL such as Opensea.org, to appear as the first suggestion using Adwords.
Always know the link you want to visit before committing to clicking on one.
Counterfeit NFTs – NFTs that look exactly like another popular NFT or one that uses someone else’s work to create their own in an attempt to sell it for a quick buck.
Either way, counterfeit NFTs are abundant. Luckily, the blockchain allows you to authenticate the original NFT among these wannabes.
Rug pulls – A scam in which project developers lure in consumers to make a quick profit. After making a quick buck, developers abandon the project and leave everyone else high and dry.
Rug pulls are arguably one of the most difficult scams to recognize because most are very convincing.
If you are aware of the common signs of a rug pull and how to avoid them, you shouldn’t have to worry too much about being taken advantage of.
This is a perfect segue into my next tip.
Always do your own research
As I mentioned earlier, research is key to buying a good NFT. Of course, the term “good NFT” is subjective. By good, what I really mean is that you are able to extract some sort of value from your NFT purchase.
I won’t dive too deep into what to look for in a good NFT. If you want to know how I’ve had success finding good buys in the past, then please check out my collector’s buying guide.
I will say that if you skip the research portion of the NFT buying process, you are more likely to fall victim to a scam.
That, or you will just end up owning an asset you don’t actually enjoy. Either way, it sucks. Always do your own research.
Don’t spend more than you’re willing to lose
I can’t emphasize this tip enough. Never spend more money than you are willing to lose. If you’re buying an NFT because you get instant value from it (such as access to an event or a physical product), that’s one thing.
But if you are buying an NFT as an investment and hope to gain monetarily from your purchase, you better not be playing with money you can’t afford to lose.
Because more likely than not, you’re going to lose. This is especially true if you are new to NFTs.
The smarter move is to set aside an amount of money specifically for NFTs.
But before you set aside any money for NFTs, make sure that you have enough cash to pay all your bills, buy your essentials, and build a nice savings.
Then, consider how much you are willing to set aside for digital assets.
Protect your recovery phrase at all costs
Your wallet’s recovery phrase allows you (and anyone who has it) to access your wallet and everything it holds.
Unless you want someone else to have access to all of your assets, do not share your recovery phrase with anyone.
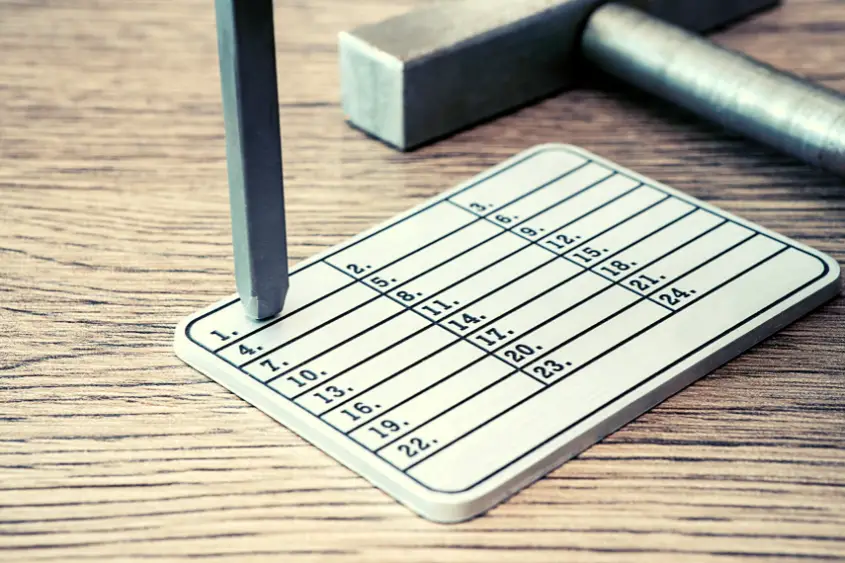
Not your bank teller, your tax expert, or even your best friend. Keep it locked away in a secure location.
With that, avoid storing your phrase on any device that’s connected to the internet such as your computer or phone.
The best way to store your recovery phrase is to write it down on a piece of paper (in pen) and put it in a fire and waterproof safe or lockbox.
If you want to take it a step further, I highly recommend stamping your phrase onto a piece of metal using this metal seed storage kit you can get on Amazon for $45.
I know… This seems a bit extreme. But, that’s how important your recovery phrase is. Stamping your phrase onto a piece of metal adds an extra layer of protection from fire and water damage. Well worth it in my opinion.
Avoid succumbing to FOMO
Fear of missing out (FOMO) is a dangerous emotion to succumb to. FOMO is anxiety-induced fear that is brought on by exciting or interesting news within the NFT space.
Such fear could arise in the form of an opportunity to make a lot of money or something that seems too good to pass up.
Oftentimes, FOMO is aroused by posts seen on social media and by word-of-mouth.
My simple solution to overcome this fear is to understand that the world is abundant. Just because you miss an opportunity today doesn’t mean there won’t be another one next month (or next year.)
I’ll be honest, I’ve experienced plenty of FOMO in my lifetime.
I’ve quickly learned that the mental exhaustion and restlessness (and gray hairs) brought on by this emotion are not worth your health and well-being.
Relax. It will all be okay. Be patient, stay calm, and keep moving forward one day at a time.
If you are experiencing FOMO and need more tips, please don’t hesitate to check out my guide which talks all about the signs of FOMO and how to overcome it.

16 thoughts on “How to Buy an NFT: A Comprehensive Guide For Beginners”
Comments are closed.