MetaMask is capable of interacting with numerous blockchain networks. But before using this function, you have to know how to add networks on MetaMask.
If you add a network incorrectly you could lose your assets or get scammed. Below I’ll walk you through the proper steps to add and change networks on your MetaMask wallet.
How to Add a Custom Network to MetaMask
There are numerous custom blockchain networks you can add to MetaMask. Below are the exact steps to add any network of your choice.
Further down the page, I have provided an extensive list of networks along with the corresponding details needed to add them to your wallet.
1. Sign in to MetaMask
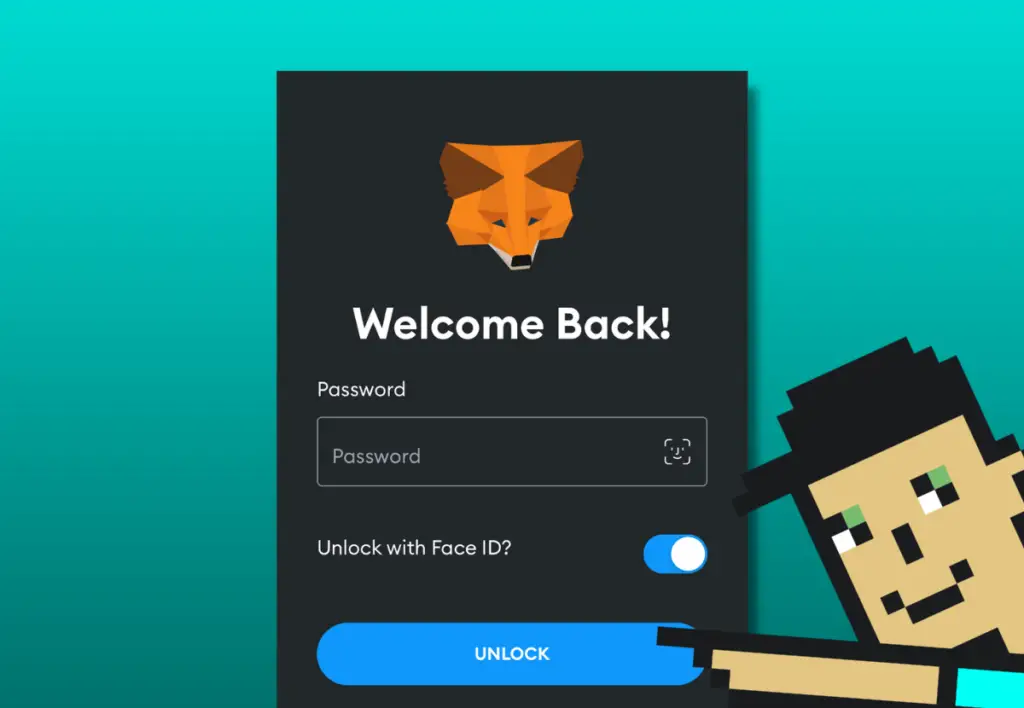
To begin, sign in to the wallet to which you want to add a custom network.
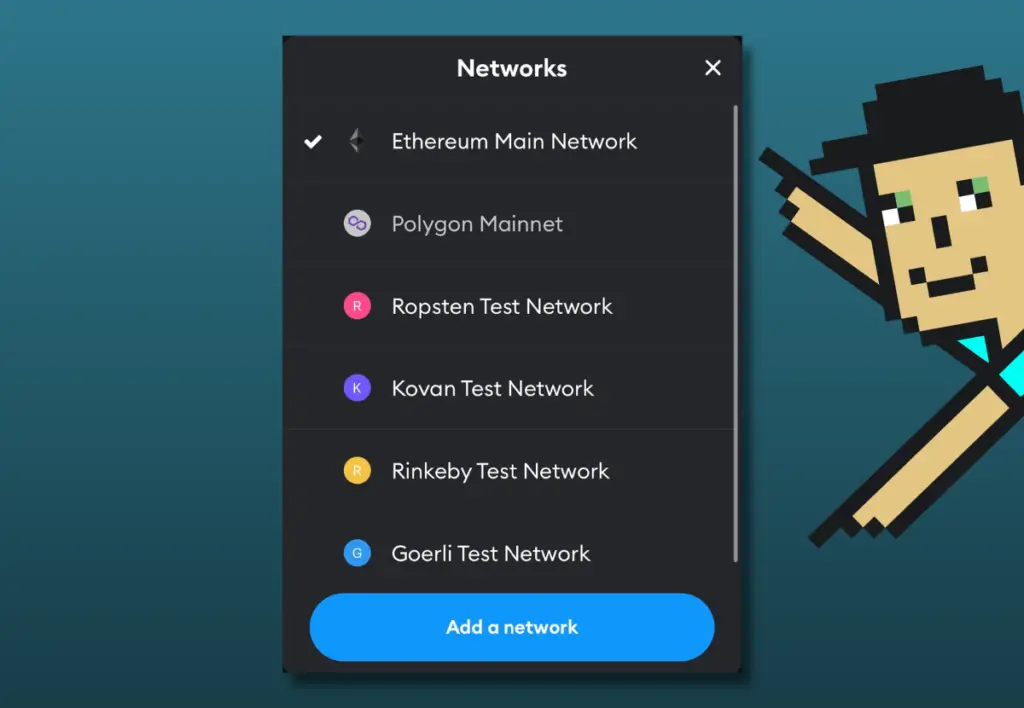
2. Select the Network Button at the top of the page
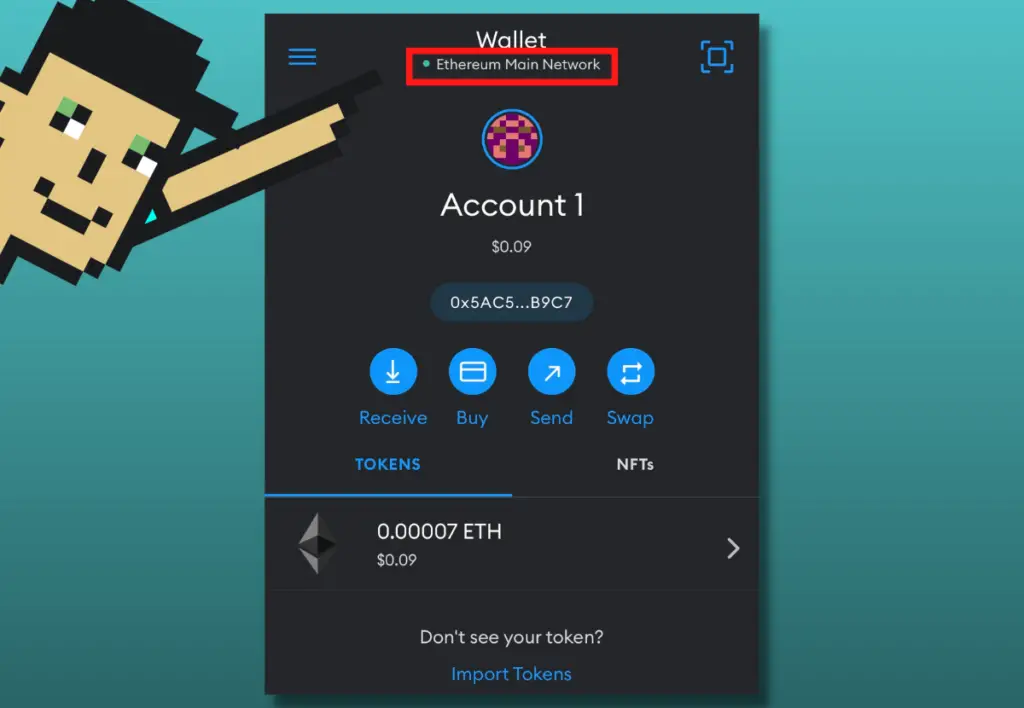
Once signed in, simply tap the network button at the top of the page. If you’ve never changed the network, this button will say “Ethereum Main Network”.
3. Tap “Add Network”, then Custom Networks
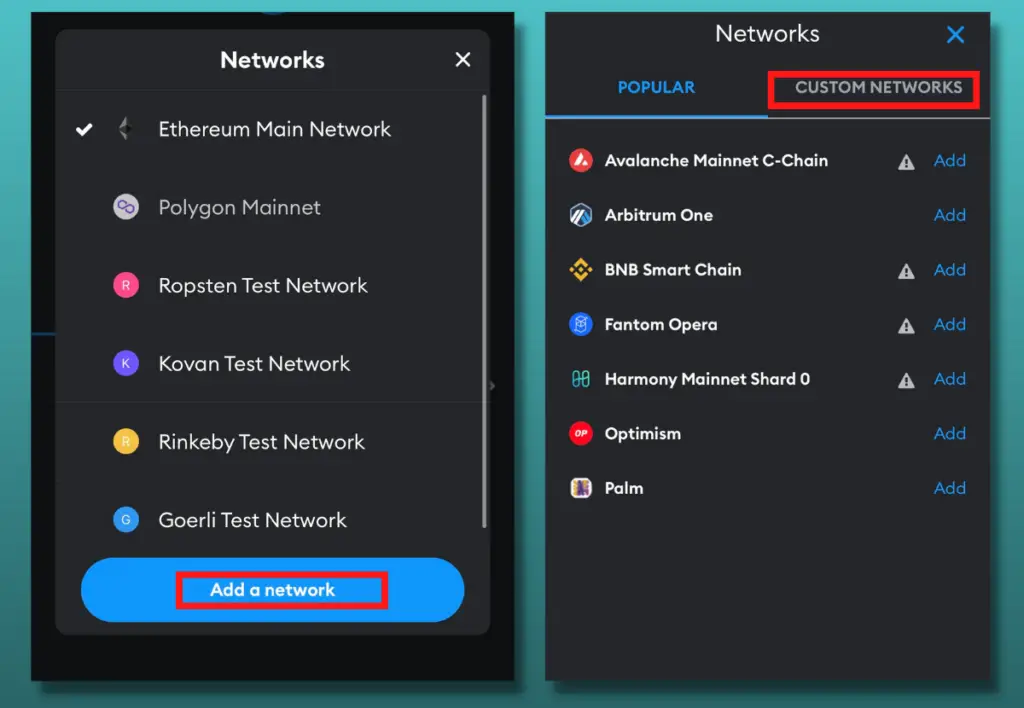
You might notice a list of networks. Ignore them and tap “Add Network”, then go the the “Custom Networks” tab.
4. Input the Network details
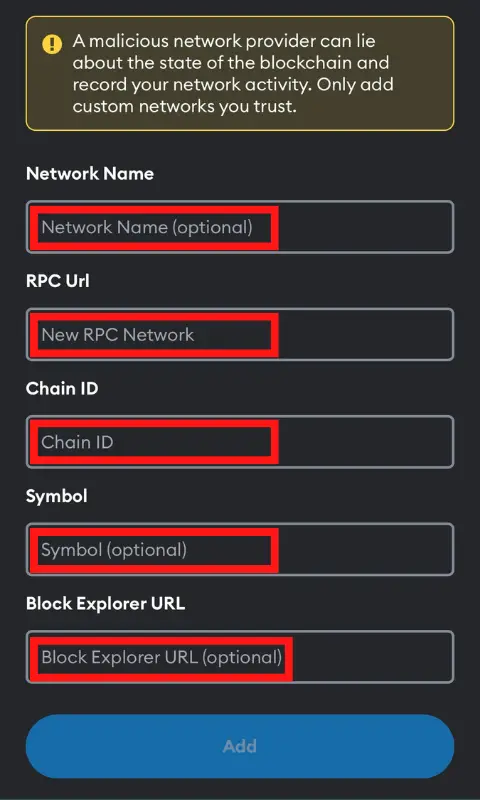
This is where you must pay close attention. If you enter any of the network details incorrectly, you risk connecting to a malicious network.
It’s important to be aware of the various MetaMask hacks, especially when dealing with different networks.
Below are the details you will need to enter to create a custom network.
Network Name:
You can input any name you’d like. I suggest entering a name that easily distinguishes the network which you’re creating, such as “Polygon Network”.
New RPC Rule:
The Remote Procedure Call (RPC) is the network’s entry point to the blockchain. If you don’t enter the correct RPC the network won’t work.
Chain ID:
Each blockchain network has its own unique chain id. This needs to be correct for the network to function.
Currency Symbol (optional):
The ticker symbol is optional. However, I recommend adding a symbol to help you distinguish between networks, such as “ETH”.
Block Explorer URL (optional):
To receive detailed information about your network transactions, you will need to input the block explorer URL. Although it’s optional, it’s worth doing.
5. Tap “Add” once complete
After verifying you’ve entered all the network details correctly, tap “Add” to add the network to your MetaMask wallet.
What Networks Can I Add to MetaMask?
Below is an extensive list of networks you can add to MetaMask along with all their details.
Cronos
- Network Name: Cronos Network
- RPC: https://evm-cronos.crypto.org
- Chain ID: 25
- Symbol: CRO
- Block Explorer: https://cronos.crypto.org/explore
Binance Smart Chain
- Network Name: Binance Smart Chain
- RPC: https://bsc-dataseed.binance.org
- Chain ID: 56
- Symbol: BNB
- Block Explorer: https://bscscan.com
Polygon
- Network Name: Polygon Network
- RPC: https://rpc-mainnet.maticvigil.com
- Chain ID: 137
- Symbol: MATIC
- Block Explorer: https://explorer.matic.network
Arbitrum
- Network Name: Arbitrum One
- RPC: https://arb1.arbitrum.io/rpc
- Chain ID: 42161
- Symbol: ETH
- Block Explorer: https://arbiscan.io/
Avalanche
- Network Name: Avalanche Network
- RPC: https://api.avax.network/ext/bc/C/rpc
- Chain ID: 43114
- Symbol: AVAX
- Block Explorer: https://snowtrace.io
Harmony
- Network Name: Fantom Opera Network
- RPC: https://rpcapi.fantom.network
- Chain ID: 250
- Symbol: FTM
- Block Explorer: https://ftmscan.com
Fantom
- Network Name: Fantom Opera Network
- RPC: https://rpcapi.fantom.network
- Chain ID: 250
- Symbol: FTM
- Block Explorer: https://ftmscan.com
EOS
- Network Name: EOS Network
- RPC: https://api.eosargentina.io
- Chain ID: 59
- Symbol: EOS
- Block Explorer: https://bloks.eosargentina.io
CELO
- Network Name: CELO Network
- RPC: https://forno.celo.org
- Chain ID: 42220
- Symbol: CELO
- Block Explorer: https://explorer.celo.org
Energy Web
- Network Name: Energy Web Chain
- RPC: https://rpc.energyweb.org/
- Chain ID: 246
- Symbol: EWT
- Block Explorer: https://explorer.energyweb.org
Huobi Eco Chain
- Network Name: HECO mainnet
- RPC: https://http-mainnet.hecochain.com
- Chain ID: 128
- Symbol: HT
- Block Explorer: https://scan.hecochain.com
Kucoin Chain
- Network Name: KCC mainnet
- RPC: https://rpc-mainnet.kcc.network
- Chain ID: 321
- Symbol: KCS
- Block Explorer: https://scan.kcc.network
OKEx Chain
- Network Name: OKEx Chain mainnet
- RPC: https://exchainrpc.okex.org
- Chain ID: 66
- Symbol: OKT
- Block Explorer: https://www.oklink.com/okexchain
Songbird
- Network Name: Songbird mainnet
- RPC: https://songbird.towolabs.com/rpc
- Chain ID: 19
- Symbol: SGB
- Block Explorer: https://songbird-explorer.flare.network/
xDai
- Network Name: xDai mainnet
- RPC: https://rpc.xdaichain.com/
- Chain ID: 100
- Symbol: XDAI
- Block Explorer: https://blockscout.com/xdai/mainnet/
XinFin
- Network Name: XinFin mainnet
- RPC: https://rpc.xinfin.network
- Chain ID: 50
- Symbol: XDC
- Block Explorer: https://explorer.xinfin.network/
How to Change Networks on MetaMask
Once you have added networks to your wallet you can easily switch between different networks.
1. Sign in to MetaMask
Sign in to the MetaMask wallet to which you want to change networks.
2. Tap the Network Button at the top of the page
Tap the button at the top of the page to bring up your current list of networks.
3. Change the Network
Choose the network you want. Yes, it’s that easy.
Why Add a Network to MetaMask?
You might want to add a network to MetaMask so that you can interact with tokens and dapps outside of Ethereum’s main network. To be able to track your account balance, execute transactions, and connect to dapps on other blockchain networks, you’d need to add that network to MetaMask.
Upon initially creating a new MetaMask wallet, its default network is the Ethereum mainnet.
But since MetaMask is one of the most popular crypto wallets in the world, users might prefer interacting with other networks besides Ethereum mainnet, using this wallet.
What Is Custom RPC?
A Remote Procedure Call (RPC) enables your wallet to communicate with various network servers and execute programs such as viewing a balance, transacting, and interacting with decentralized applications (dapps).
Hence, you can access different server nodes on a specified network and interact directly with that blockchain.
Connecting to an NFT marketplace is an example of interacting with a dapp. Your wallet uses the network’s RPC to do this.
That said, MetaMask can only connect to networks that are EVM-compatible. The Ethereum Virtual Machine is the software responsible for executing smart contracts and calculates the state of the Ethereum blockchain when a new block is added.
This software sits on top of Ethereum’s hardware and network.
EVM has reduced the barrier to entry for many popular blockchains, such as those listed above, by allowing developers to deploy smart contracts on new chains using code that is compatible with Ethereum’s main network.
As a result, we can interact with these networks using an Ethereum-based wallet like MetaMask.
Is My MetaMask Address the Same for Different Networks?
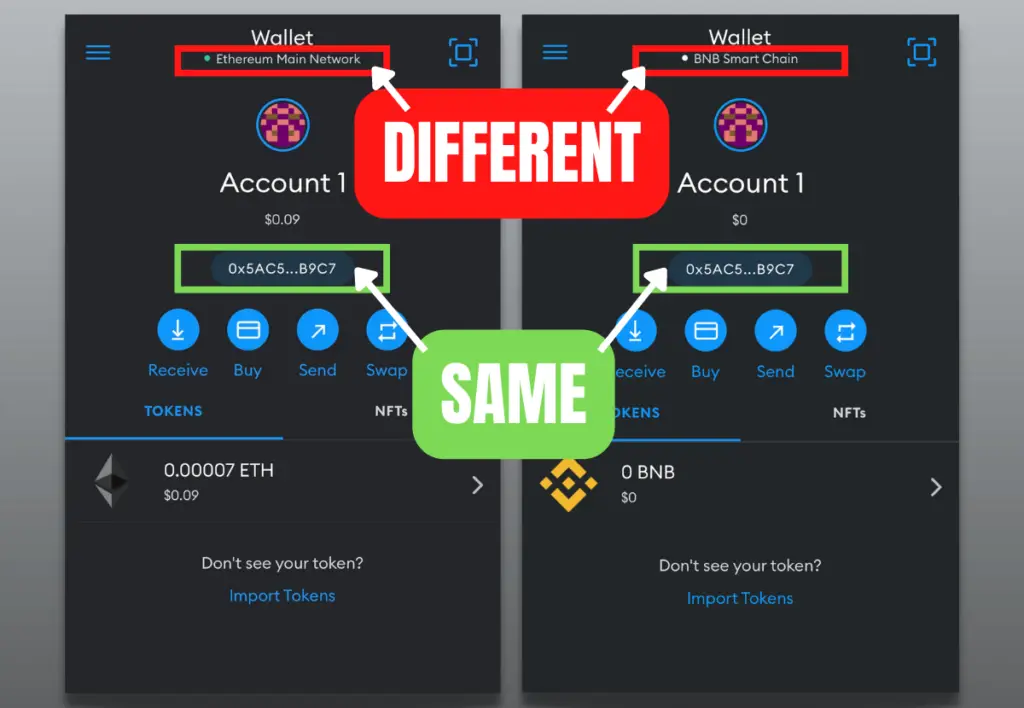
Your MetaMask address is the same regardless of the network you connect to. This is because all EVM-compatible networks share the same Ethereum address format that begins with 0x, and is followed by 40 alphanumeric characters.
That’s not to say that there isn’t some risk involved when interacting with different networks.
Never use an address to send or receive assets that don’t use Ethereum’s “0x” format. Also, you should never send tokens directly from one network to another without bridging them first, as you will likely lose them.
For example, you can send Polygon tokens to your MetaMask “Polygon” account and easily view them in your wallet, but you won’t be able to use these tokens unless you’ve bridged them.
Bridging a token is a completely different topic that requires your full attention. If you want to learn more, MetaMask has created an extensive guide to bridges.