The new iteration of the web is built on decentralized applications using blockchain technology. But in order to access Web3 and everything that comes with it like cryptocurrency and NFTs, you need a user interface like MetaMask.
So, what is MetaMask? Below you’ll learn exactly what it is, how to set up your own wallet, and how you can use it to access the decentralized web.
What Is MetaMask?
MetaMask is a browser extension and mobile app used to access the decentralized web. It serves as your private key vault, crypto wallet, token exchange, and browser, providing everything you need to manage your blockchain-based digital assets. It’s essentially your digital identity for Web3.
At its core, MetaMask is a digital wallet. Once installed, you can buy, sell, trade, and store Ethereum-based cryptocurrencies and NFTs, plus, browse thousands of decentralized applications (dapps) and exchanges (DEXs).
ConsenSys originally created the company in 2016 when it existed as a desktop extension for Google Chrome and Firefox browsers. Then in 2019, before the crypto and NFT bull-run, they created the mobile application which helped it scale to millions of users.
If you are just starting your journey into the world of cryptocurrencies and NFTs, MetaMask is one of the best wallets available.
How to Setup a MetaMask Wallet
Getting started is always the hardest part. It might seem like a lot at first, but creating your MetaMask account is actually really easy, and can be done in a matter of minutes by following the steps below.
1. Download the Metamask extension or mobile app
The first step is to download MetaMask onto your preferred device. For this guide, I’ll be using Google Chrome. That said, supported browsers include:
- Brave
- Firefox
- Edge
- Opera
- iOS and Android devices
This process is largely the same regardless of which browser or device you use.
It’s extremely important that you download MetaMask from the official website. If you don’t, you risk installing a fake version of the software which can result in scammers stealing your funds and other important info.
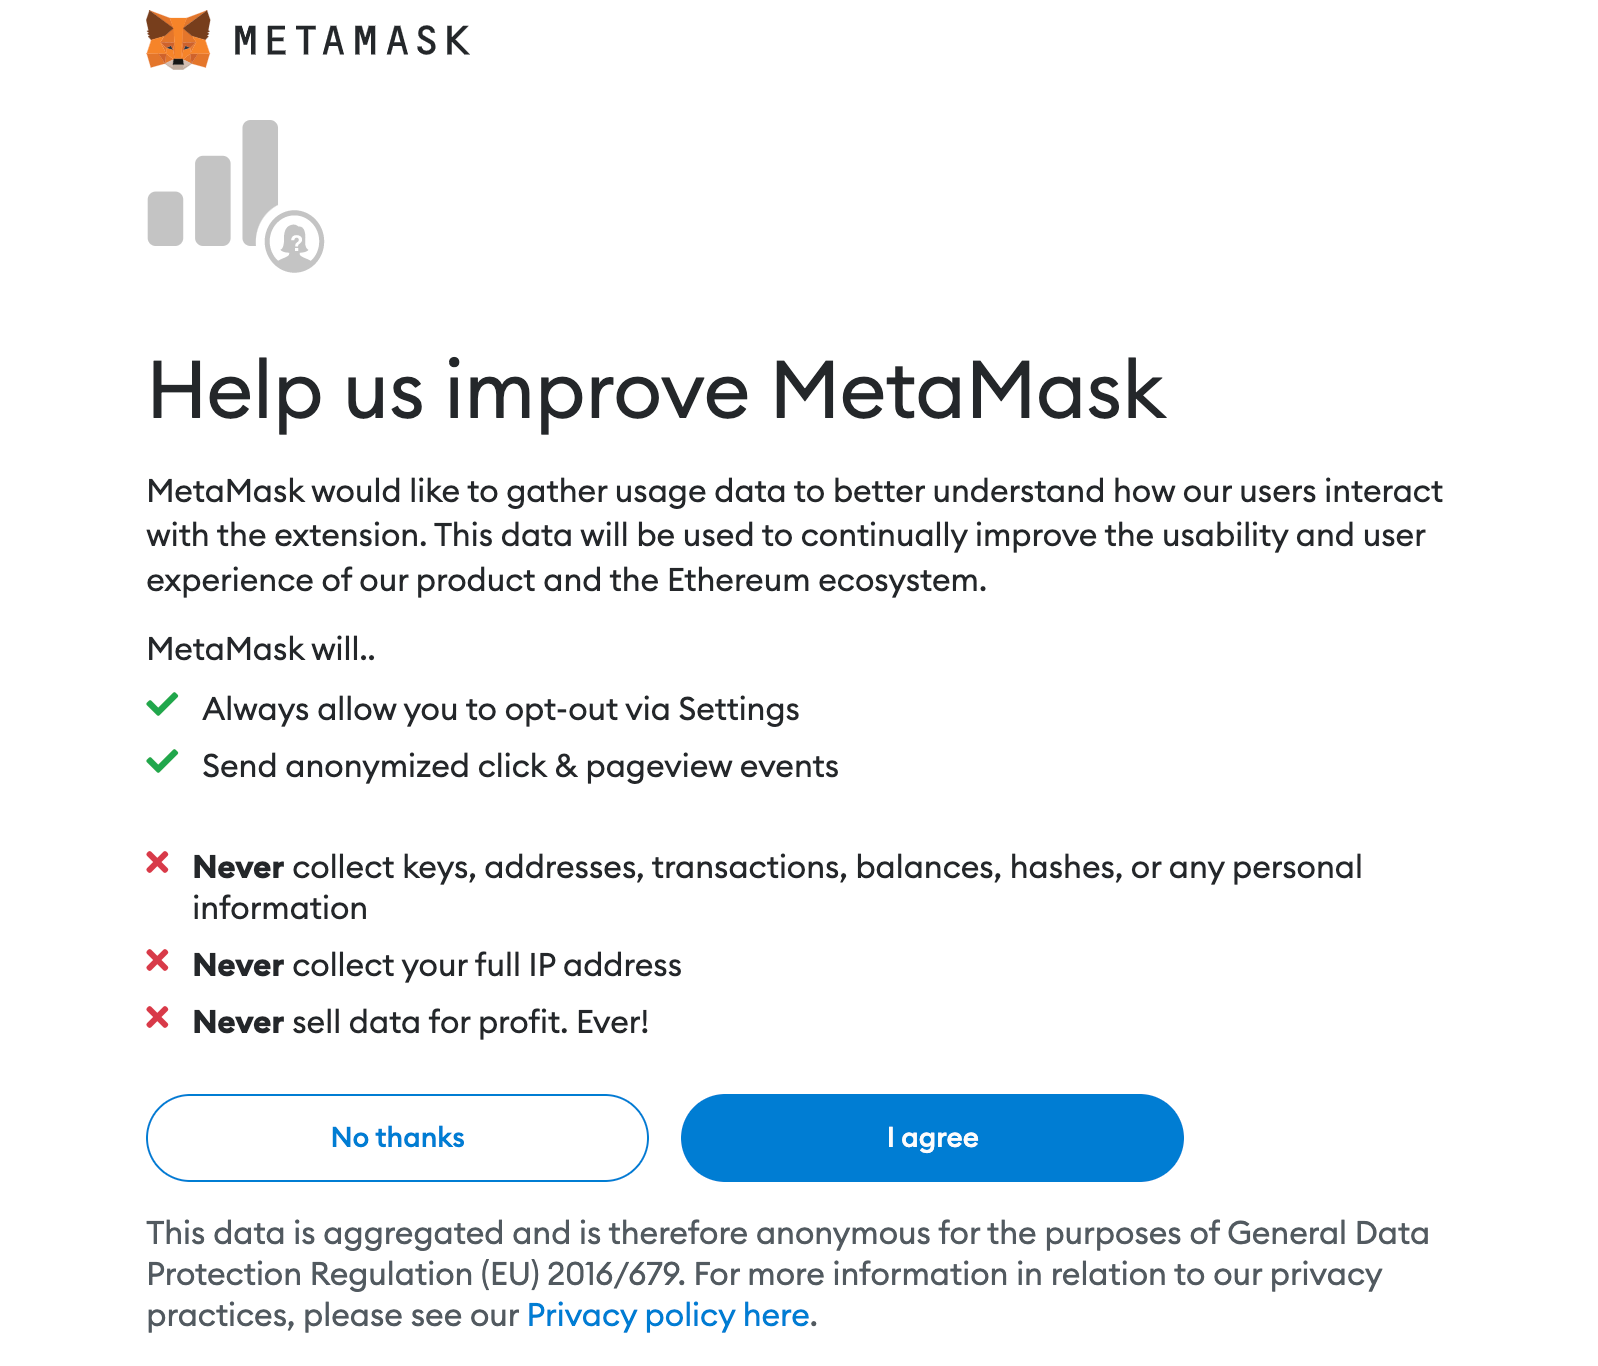
Once downloaded, the extension will pop up with the “Get Started” button. Tap this to start creating your Ethereum wallet.

After clicking this button, you will be asked to either agree or disagree to helping improve MetaMask by sharing certain data. You can choose “I Agree” or “No Thanks”. I generally agree since they don’t share your IP address, private keys or sell your data.
Also, if you agree now but decide you want to change what data you share with them, you can always update it in the settings later.
2. Tap Create a wallet
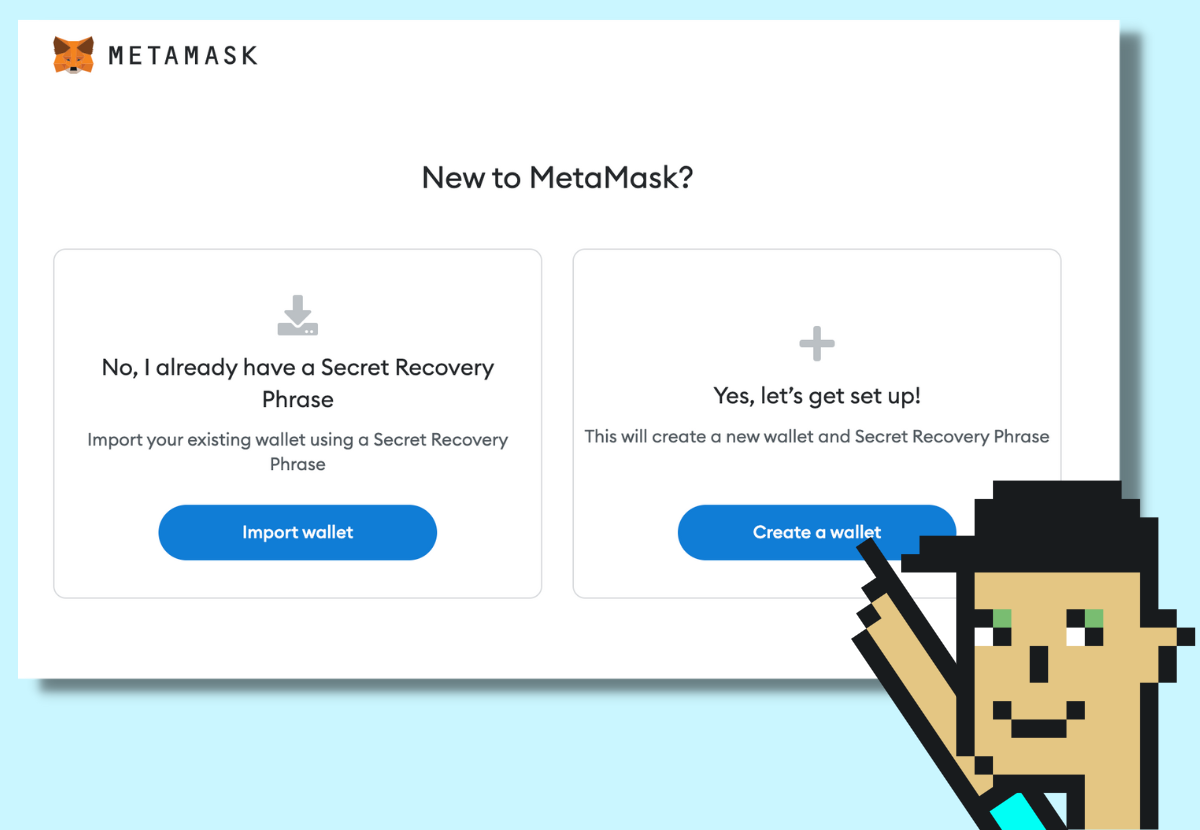
Next, tap “Create a Wallet” to get started with your account and create a secure password. It must be a minimum of 8 characters.
However, I suggest using more characters along with upper and lower-case letters, numbers, and symbols. Make sure it’s a password you haven’t used before. Once created, write your password down on a piece of paper, don’t store it on your device.
Then, read and accept the “Terms of Use” before tapping “Create”.
3. Secure your wallet’s seed phrase
This next step is the most important. MetaMask will present you with your 12-word seed phrase. Your seed phrase is the key to your wallet. Whoever knows this phrase has complete access and control over your wallet and everything in it.
If you lose access to your wallet or uninstall the app, you can only regain access to it using your phrase.
That said, make sure to write it down carefully. The words need to be recorded in the same order displayed on your screen.
Before revealing your phrase to you, a short video will be presented to you. Make sure to watch the video as it covers the importance of keeping your seed phrase safe. I’ll leave that same video below here so you can watch it now if you’d like.
After watching the video, hit “Next” and tap on the grayed-out area to reveal your secret words.
Remember, your seed phrase is of the utmost importance. After writing it down you should store it in multiple places preferably, such as a bank vault, safe deposit box, or an at-home safe.
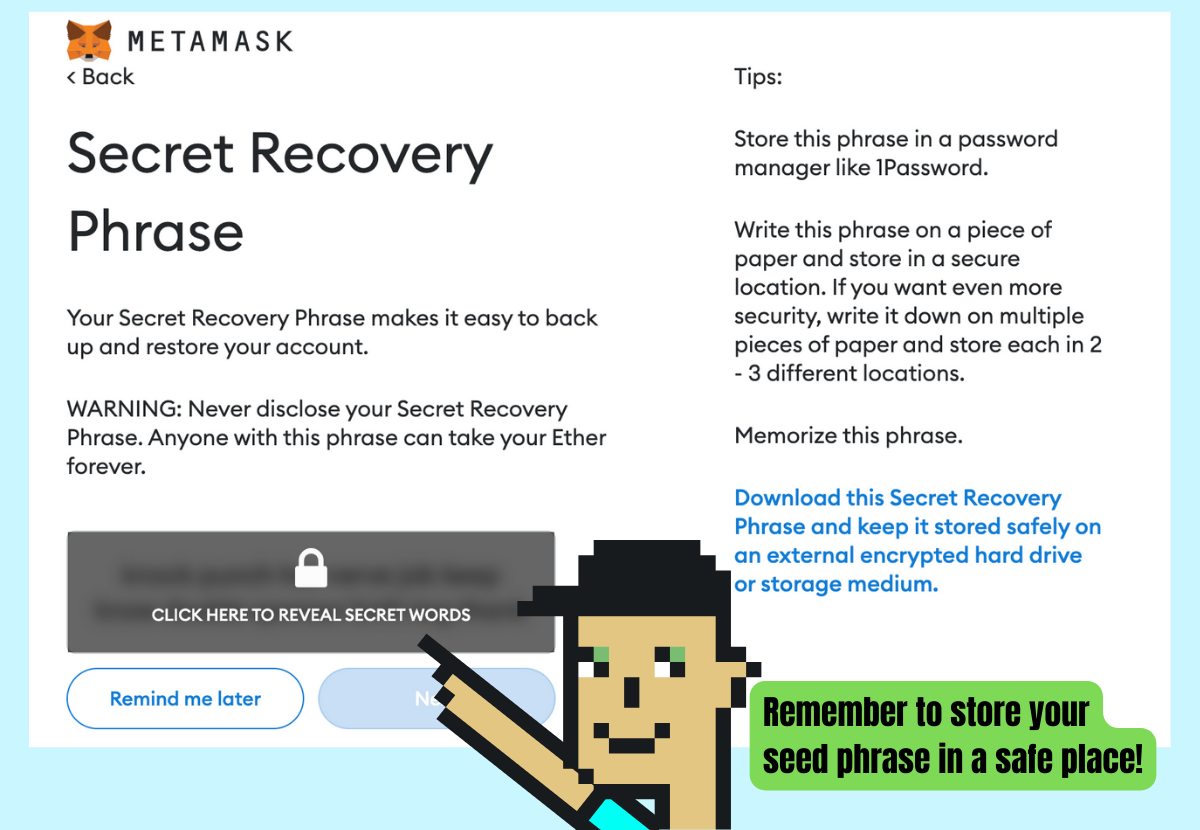
As well, you should consider engraving it into a metal seed phrase plate rather than writing it on a piece of paper. That way it remains water and fireproof. You never know what could happen.
4. Confirm your secret recovery phrase
After recording your secret phrase, you will need to confirm that you wrote it down correctly. Enter the words in the same order you wrote them down in, and hit “Confirm”. If you successfully enter your secret phrase, your wallet will display a Congratulations page. Woohoo!
Now click “All Done”.
Your wallet is officially set up. You can log in to your wallet using the password you created. Just know that if you forget your password, you’ll need to enter your seed phrase to create a new one.
MetaMask can’t help you if you lose your password, seed phrase, or any assets stored in your wallet. That’s why it’s called a non-custodial wallet—meaning you have complete control over your private keys and assets. With that comes a big responsibility though.
How to Use Your MetaMask Wallet

Now that you’ve got your wallet installed, let’s discuss how to use it. Below I outline the functions of each button/tab and how to use it.
Ethereum Mainnet
By selecting the Ethereum Mainnet tab at the top of your wallet you can change networks. The only reason you would need to change your network is if you are interacting with a dapp outside of Ethereum or to interact with other cryptocurrencies and assets.
Once you add a network, you can easily switch back and forth by clicking this button.
Wallet Settings
The cool little colored circle in upper the right-hand corner is your wallet settings. This is where you can create a new account using the same wallet, import an existing account, connect a hardware wallet, and view the settings for your wallet.
Account (public wallet address)
Towards the top of your wallet, you’ll find your public wallet address. This address is like an email address for your wallet. That is, it’s safe to share with anyone and you use it to send and receive digital assets like NFTs and crypto.
Buy button
This button is used to purchase ETH directly in the app. This is a nice feature because there are options to buy it using your debit card. Just know that no matter which exchange you choose, you will have to create an account on that platform before being able to purchase your crypto.
Send button
If you want to send crypto or NFTs to another wallet, the “Send” button is your best friend. To send an asset you will need to know the receiving wallet’s public address. Additionally, anytime you send something on the Ethereum blockchain you have to pay a gas fee.
In simple terms, a gas fee is a transaction fee that’s paid to validators who help secure the network and keep it operational. This fee is not implemented by MetaMask nor does the company have a say in the fee.
Swap button
The Swap button enables you to swap one cryptocurrency for another. For example, if you’ve got $100 in ETH, you can use this button to trade your ETH for $100 worth of USDC. Again, this requires a gas fee and MetaMask does charge a small service fee (0.875% to be exact) for the transaction.
Assets tab
The assets tab allows you to view all your digital assets including crypto and NFTs. Most assets will appear in your wallet automatically. However, in some instances such as with NFTs, you may have to import the tokens into your wallet manually.
Activity tab
This tab displays all of your transactions such as when you make a purchase, sell an asset, and send or receive something. In some cases your MetaMask transaction can get stuck, if this happens you can cancel the pending transaction using various methods.
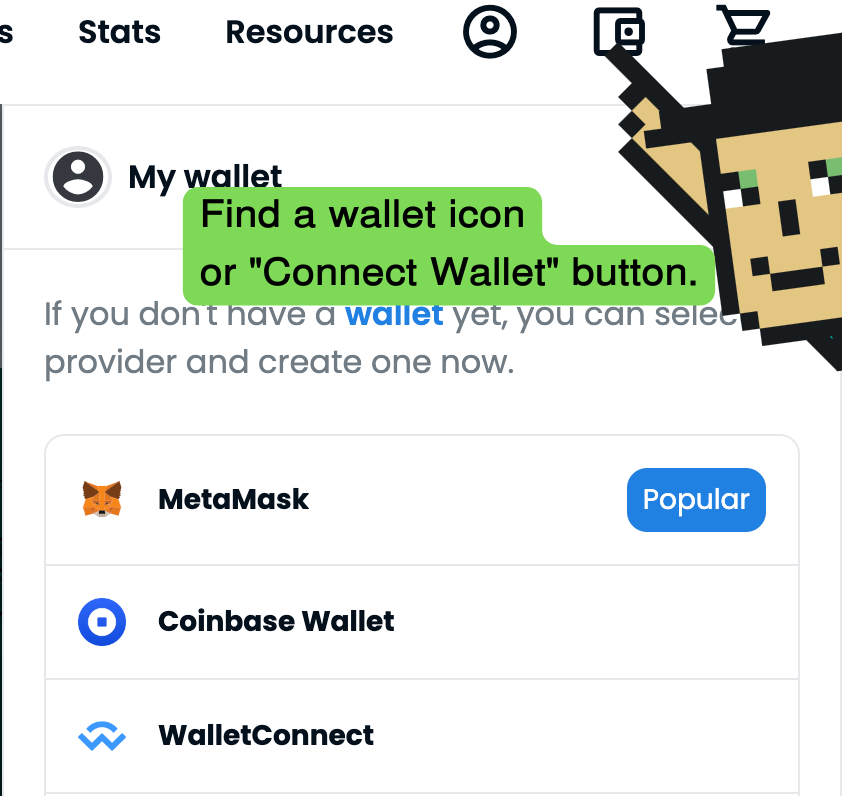
How to Connect to Dapps
To interact with dapps using your MetaMask wallet, you need to find a button that says “Connect Wallet” or something similar on the dapp you’re trying to use. Upon clicking this button, a prompt will appear asking you to approve the connection. Once approved, your wallet will connect to the platform.
Below is an example of how to connect your wallet to Opensea—an NFT marketplace dapp. By connecting your wallet you are only enabling the dapp to view your address, it doesn’t give the platform access or control over your wallet or your funds.
After you click connect wallet, you will have to choose the type of wallet you have. If you have multiple accounts in your wallet, choose the one you want to connect.
Next, tap “connect” to connect your wallet.
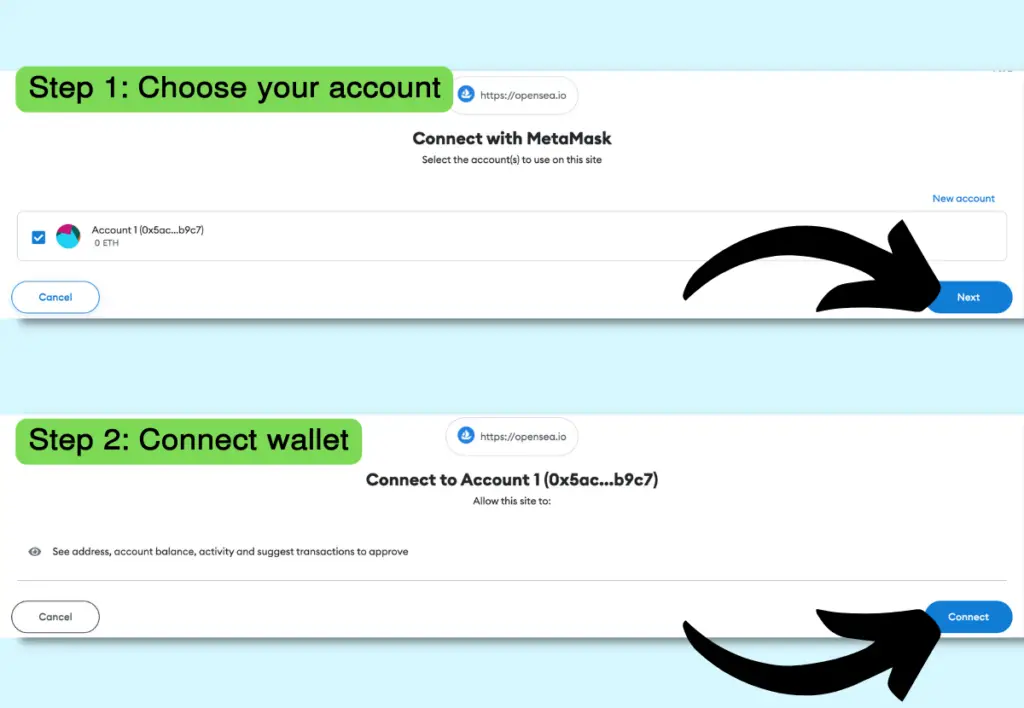
This process looks the same for most dapps. Also, a similar prompt will appear if you purchase something from a decentralized platform.
MetaMask Pros and Cons
There’s a reason why MetaMask remains one of the most popular and trusted crypto wallets in the industry. Below are some pros and cons to consider for yourself.
| Pros | Cons |
|---|---|
| Available on both desktop and mobile devices. | It’s more susceptible to hacks since your data is stored in the software, which is connected to the internet. |
| Non-custodial, meaning you’re in full control of your wallet and assets. | Best suited for transacting, not for long-term storage. |
| It’s free to download and use. | |
| Easy to use with its user-friendly interface. | |
| Easy integration with hardware wallets like Ledger. | |
| Compatible with numerous blockchains and various digital assets. | |
| Trusted by millions of other users. |
Is MetaMask Safe?
MetaMask is a safe wallet overall. But, if you aren’t aware of how your wallet can be hacked you’re more likely to fall victim to scammers. That said, MetaMask is great for beginners who want to understand how Web3 works. But if you’re serious about keeping your assets safe there are better alternatives.
That’s why I always recommend using MetaMask solely for transactions—never as a storage solution, especially if you have a lot of crypto or other valuable assets.
What Are the Alternatives to MetaMask?
- Ledger – The most popular and secure hardware wallet on the market—best suited for those looking for ultimate protection against hackers.
- Trezor – A luxurious hardware wallet that provides serious security for your assets.
- Coinbase Wallet – A user-friendly software wallet created by the number one crypto exchange in the world, Coinbase.
- Brave Wallet – A wallet developed by the popular Brave Web3 browser that’s integrated directly into the browser.
- Trust Wallet – Considered one of the best cryptocurrency software wallets. It’s free to download and easy to use.
Again, if you are looking for the best wallet to store your digital assets, I highly recommend getting a hardware wallet such as Ledger.
Any software wallet you use comes with the same risks as MetaMask. You can still use MetaMask, but for the best security, you should transfer your assets to a hardware wallet immediately. That way, MetaMask is only used to complete transactions and not for storage.
14 thoughts on “What Is MetaMask Wallet? (2023 Complete User Guide)”
Comments are closed.