Creating your own NFT collection on Opensea is not only simple, but it’s also free. After creating my own collection, I learned the exact steps you need to take to get it done. So, how do you create an NFT collection on Opensea?
Follow this step-by-step guide below to create your collection in minutes.
How to Create a Collection on Opensea
1. Login to Opensea Using Your Web3 Wallet
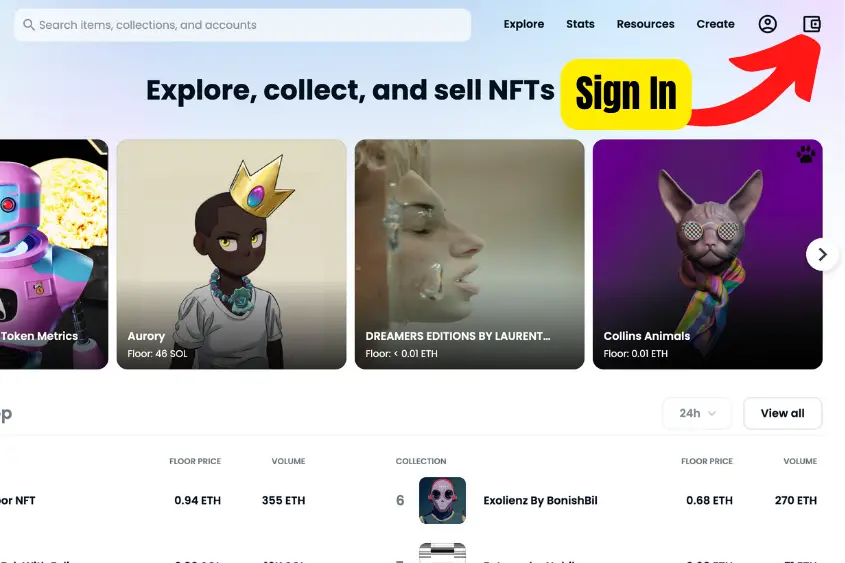
If you already have a wallet that’s compatible with Opensea, go to Opensea and log in. If you don’t have a wallet, one of the most popular options is Metamask.
2. Go to the Profile Tab, then My Collections
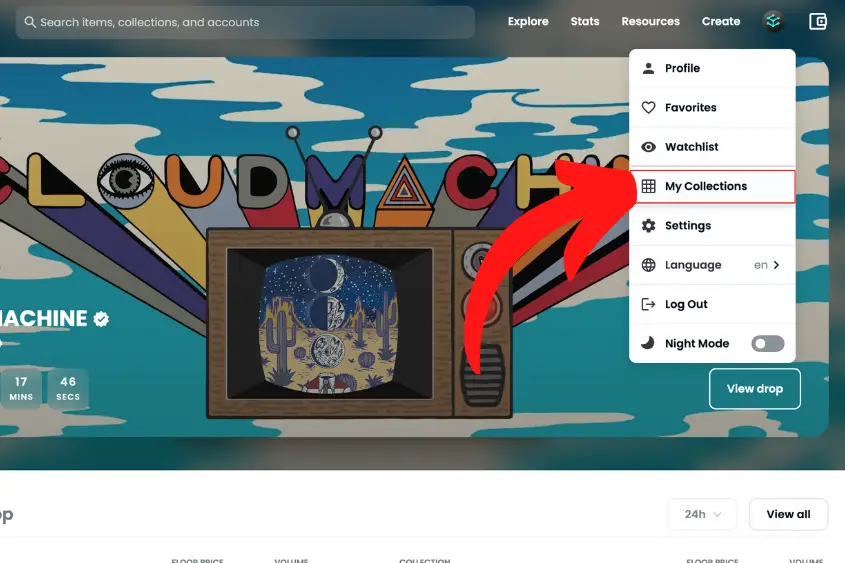
Once you’re logged into Opensea, navigate to the Profile tab and select My Collections.
3. Tap Create a Collection
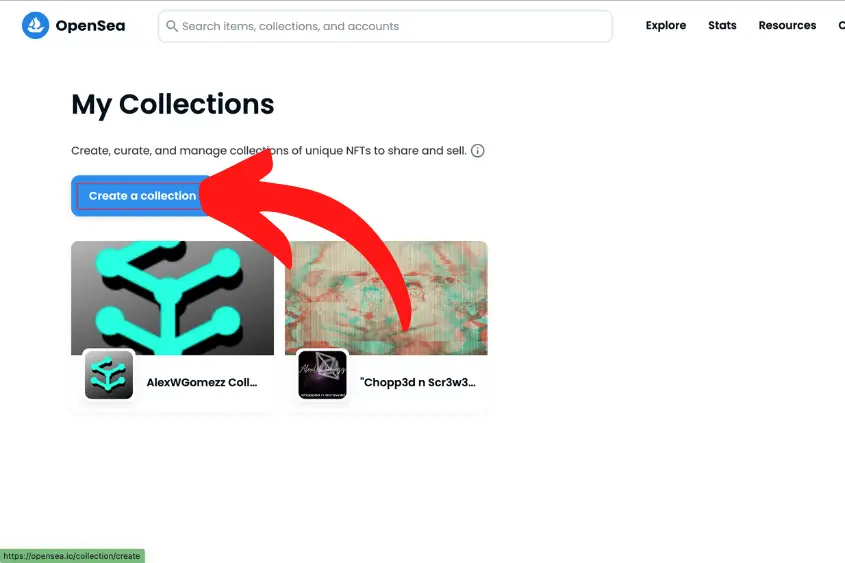
Tap Create a collection. Note that collections can be created either directly on OpenSea or imported from an existing smart contract.
You can also mint on other services like Rarible or Mintable and import your items to OpenSea.
4. Fill In the Collection Details and Hit Create
Once you select “create a collection”, you will be taken to the Create a Collection page. This is where you will enter all the details about your NFT collection.
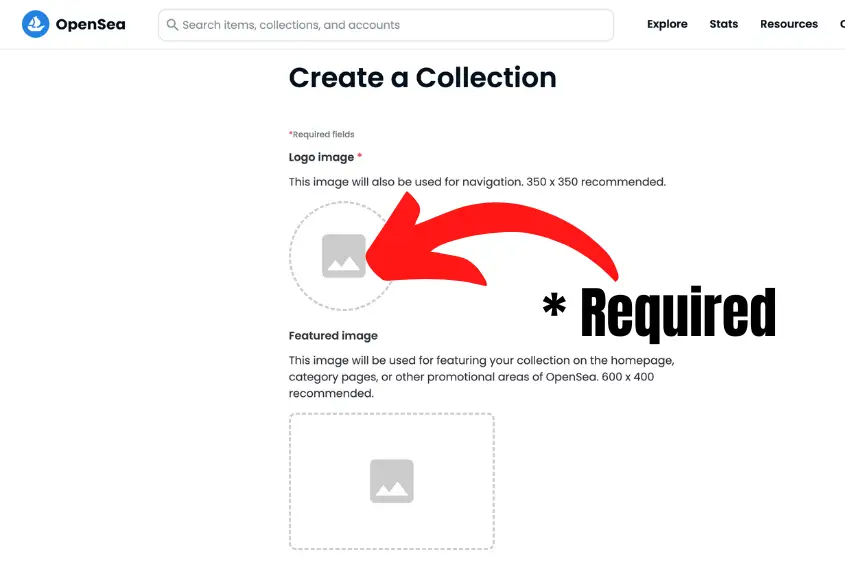
Below are all the options available to customize your Opensea collection to your liking.
Note that some fields are required, while others are optional. It’s best to fill out your collection details with as much information as you can.
- Logo Image (required): Upload a 350 x 350 image to display your brand’s Logo. It will also be used for navigation.
- Featured Image: This 600 x 400 image is used for featuring your collection on the homepage, category pages, or other promotional areas of OpenSea.
- Banner Image: This 1400 x 350 image appears at the top of your collection page. Avoid including too much text in your banner image, as the dimensions change on different devices.
- Name (required): Enter the name of your collection here. Generally, shorter names are better.URL: Opensea allows you to customize your collection’s URL. It can only contain lowercase letters, numbers, and hyphens. For example, my collection URL could be “https://opensea.io/collection/cyber-scrilla.”
- Description: Use this space to enter a description for your NFT collection. You have 1,000 characters to work with, so be concise if you want to fit it all in.
- Category: Adding a category to your collection will help make your item more discoverable on OpenSea. If you’re having trouble choosing a category, “Collectible” is a good option.
- Links: Use this field to add relevant external links for your project. You can add a link to your own website, Discord, Medium, and Telegram.
- Creator Earnings (Royalties): Looking to add or split royalties? This is where you do it. Enter your wallet address and up to 10% royalties to earn that percentage of the sale price every time one of your items is sold. You can add multiple addresses to split royalty payments, however, this may increase gas fees for buyers.
- Blockchain: Select the blockchain where you’d like new items from this collection to be added by default. You can choose from Arbitrum, Ethereum, Klaytn, Polygon, Optimism, or Solana.
- Payment Tokens: Choose which tokens can be used to buy and sell your items. Depending on the blockchain you choose, you are able to select different payment options.
- Display Theme: This allows you to choose how your NFTs will be displayed within your collection. You can choose Padded (for assets with transparent background), Contained (for assets that are not a 1:1 ratio), or Covered (for assets that can extend to the edge).
- Explicit & sensitive content: Be sure to enable this if your collection is explicit or is not safe for work (NSFW) content, as this will protect users with safe search while browsing OpenSea. If you don’t enable this and your items are explicit, it could be flagged and taken down by Opensea.
Once you have input all the details you possibly can click Create. Congratulations! You successfully created a collection on Opensea.
How to Add NFTs to Your Opensea Collection
Now you’re probably wondering how to get NFTs into your collection.
To add NFTs to your collection you need to know how to create NFTs on Opensea. This only takes a few minutes and is free. During the creation process, you choose the collection where your item(s) will appear. If you want to add an existing NFT to your collection, edit it and choose the collection.
You can only add an existing NFT that you created into your collection if you haven’t frozen its metadata or sold the item.
To do this, simply click the NFT, select Edit, then choose the collection you want this NFT to appear in.
Cost to Create an NFT Collection on OpenSea
It’s free to create an NFT collection on Opensea. But, if it’s your first time selling on Opensea or if it’s a new collection, you will need to pay a gas fee to allow Seaport to interact with your item (or all items in the collection, if the collection supports it). After that, there are no fees.
The buyer will pay the gas fee to publish it to the blockchain at the time of purchase. Additionally, Opensea also takes 2.5% of the sale price whenever you sell an NFT.
Note that if someone makes an offer on your NFT and you accept it, you will have to pay a gas fee to accept the offer.
So ultimately, there’s no way around paying a gas fee. At least, not if your NFT collection is on the Ethereum blockchain.
How to Edit Your Opensea Collection
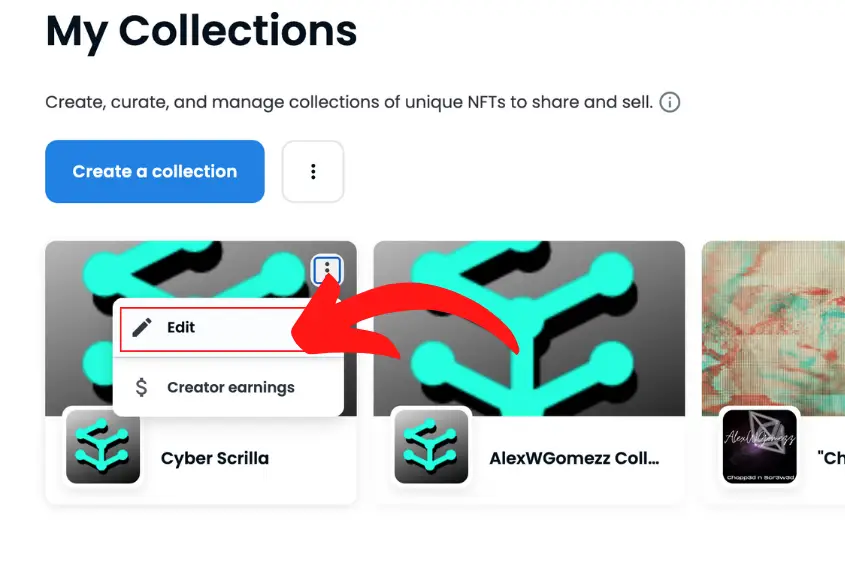
To edit your Collection on Opensea, go to My Collections, tap the three dots on the collection that you want to edit, and hit Edit. From there, you can edit any details about your collection including images, the name, category, links, and payment tokens. The only thing you aren’t able to edit is the blockchain.
How to Create a Collection on Opensea Mobile
You can also create a collection using your mobile device. Just make sure your wallet is accessible on your device and follow the steps below.
1. Go to Your Account, Click My Collections
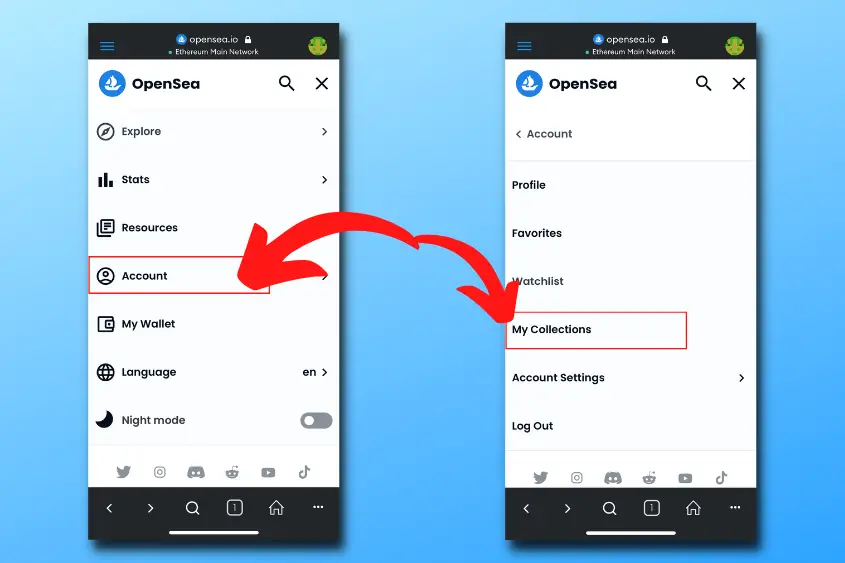
Sign in to your Opensea profile, go to your Account, then tap My Collections.
2. Tap Create A Collection
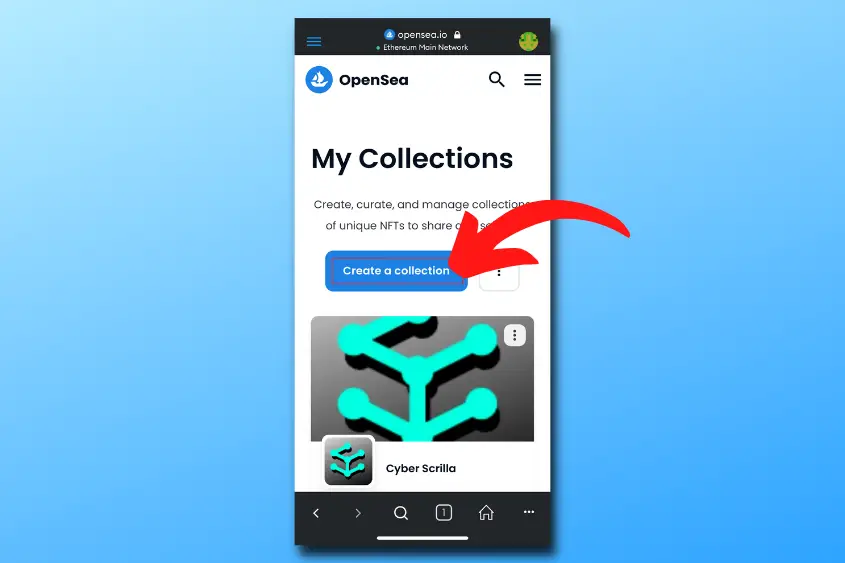
Select “Create A Collection”, this will take you to the page to edit all the details.
3. Sign the Message to Accept Opensea’s Terms of Service
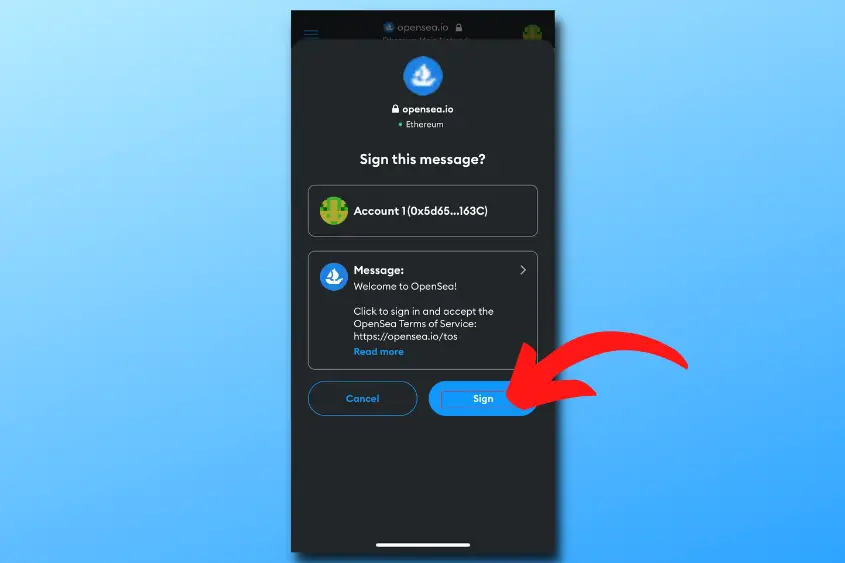
You will have to sign a message using your wallet to accept Opensea’s Terms of Service.
4. Fill in the Collection Details
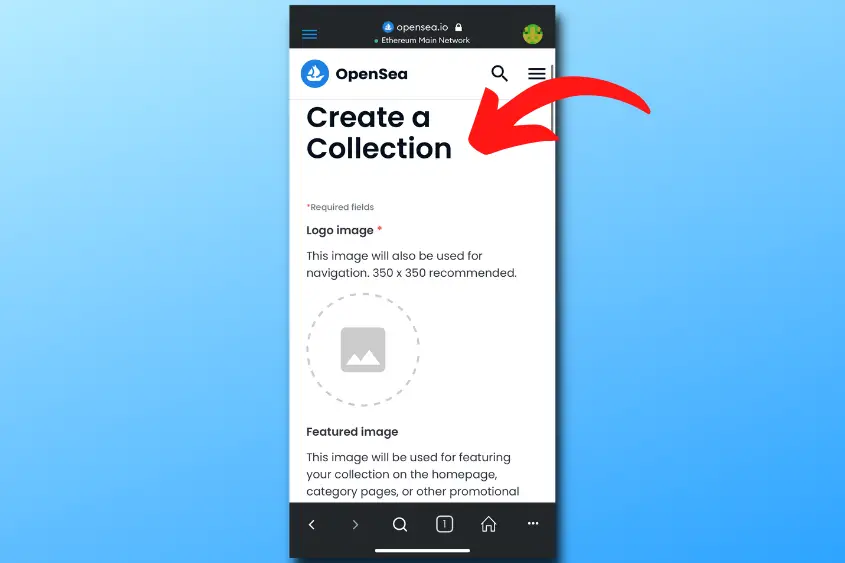
Now, you’re ready to fill in all the details. The only two required details to create a collection are the collection logo and name.
The other details are options. However, I suggest you fill in as many details as possible.
5. Hit Create to Finalize Your Collection
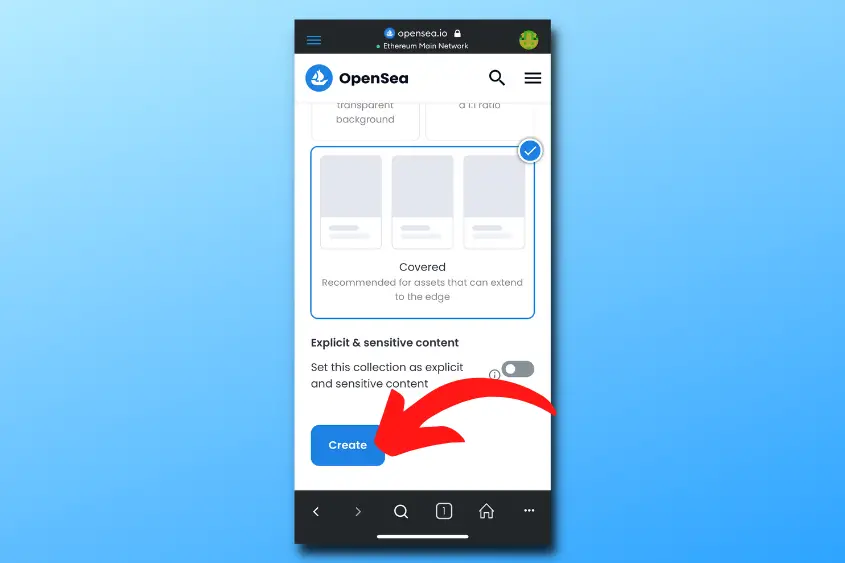
Once your collection is good to go, hit Create to publish it to Opensea.
Conclusion
Creating an NFT Collection on Opensea can be done in 4 steps. Sign in to your Opensea profile, go to the My Collections tab and fill in the details, then review the details before tapping Create to publish your collection for free. To add an NFT to your collection, tap Add Item on your collection.

1 thought on “How to Create an NFT Collection on Opensea in 2023 (Full Guide)”
Comments are closed.