Knowing how to send Ethereum to a MetaMask wallet is crucial. Without this skill set you can’t purchase digital assets or store your crypto safely. Having sent ETH to my MetaMask wallet countless times, I felt it was necessary to create this step-by-step guide.
Below you’ll learn exactly how to transfer ETH to Metamask, the cost, and alternative methods for quickly and easily funding your wallet.
How to Send Ethereum (ETH) To a Metamask Wallet
Step 1: Sign into the platform where you have ETH
To send ETH to your MetaMask wallet you’ll want to start wherever you currently have your ETH stored. These steps are assuming you’ve set up your MetaMask wallet and you’re ready to go.
This process is largely the same regardless of which exchange or wallet you currently have your crypto stored in. For this example I’ll be using the Coinbase Exchange.
If you haven’t already purchased ETH you can do so using Coinbase.
To set up a Coinbase account follow the steps below.
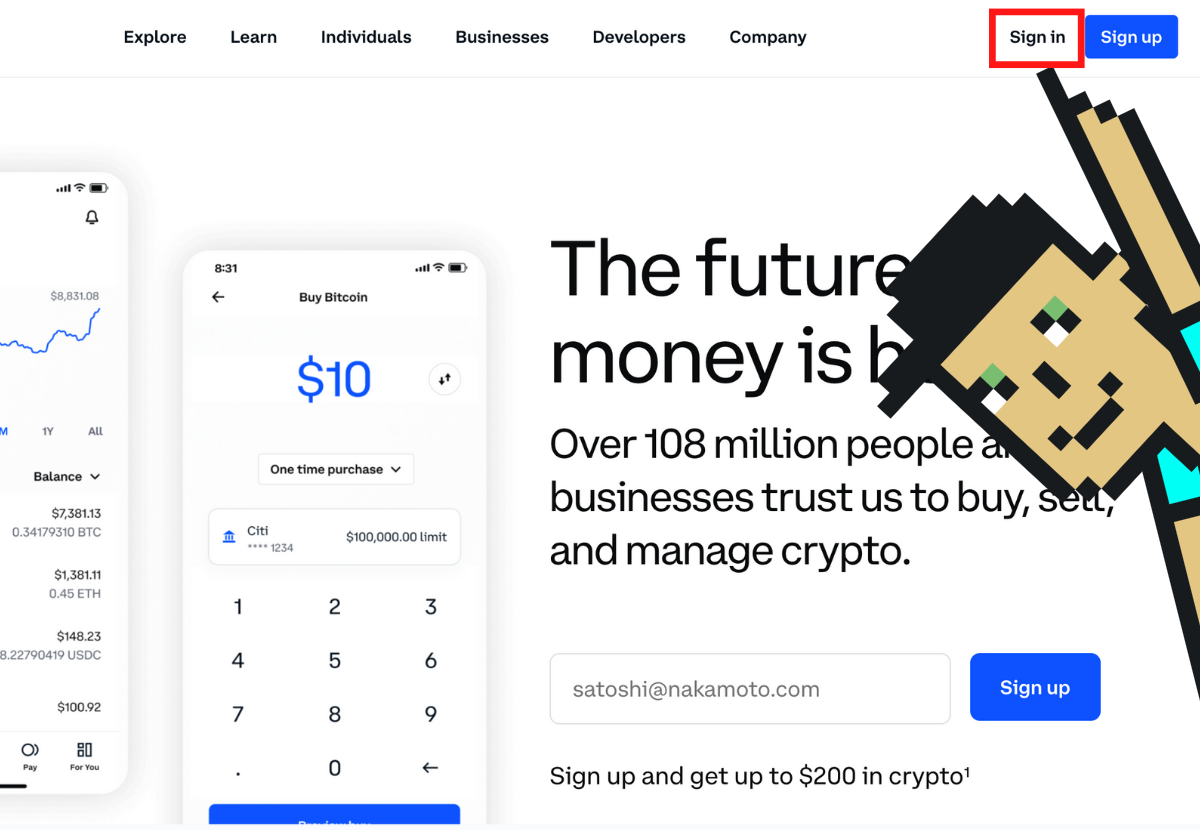
- Go to Coinbase, and tap Sign up.
- Enter your personal details.
- Verify your email.
- Enter your phone number to set up 2FA.
- Select your citizenship.
- Verify your identity.
- Link a payment method.
After linking your payment method you can use your account to buy ETH.
Step 2: Tap send to initiate the transfer
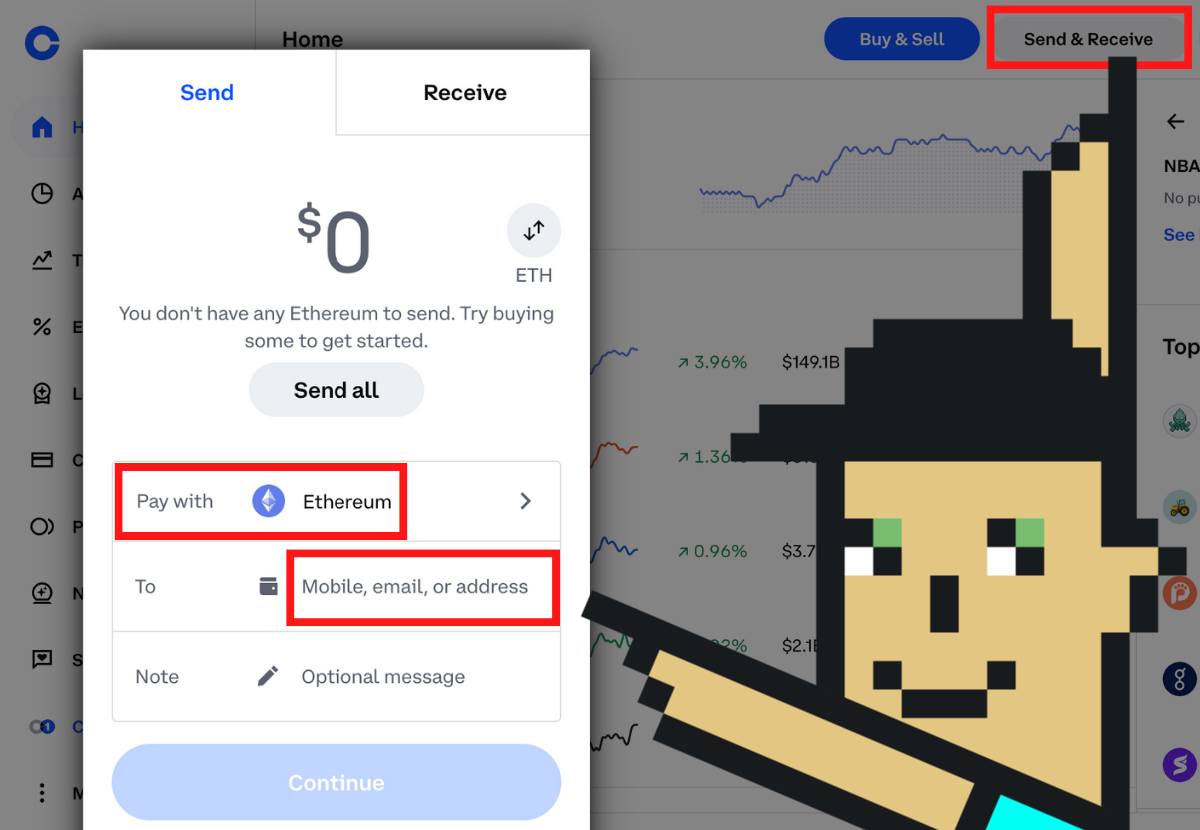
To initiate the transfer tap the Send/Recieve button. Next, choose the amount of ETH you want to send to the MetaMask wallet. Be sure to select “Pay with Ethereum”.
Step 3: Copy/Paste your MetaMask address into Coinbase
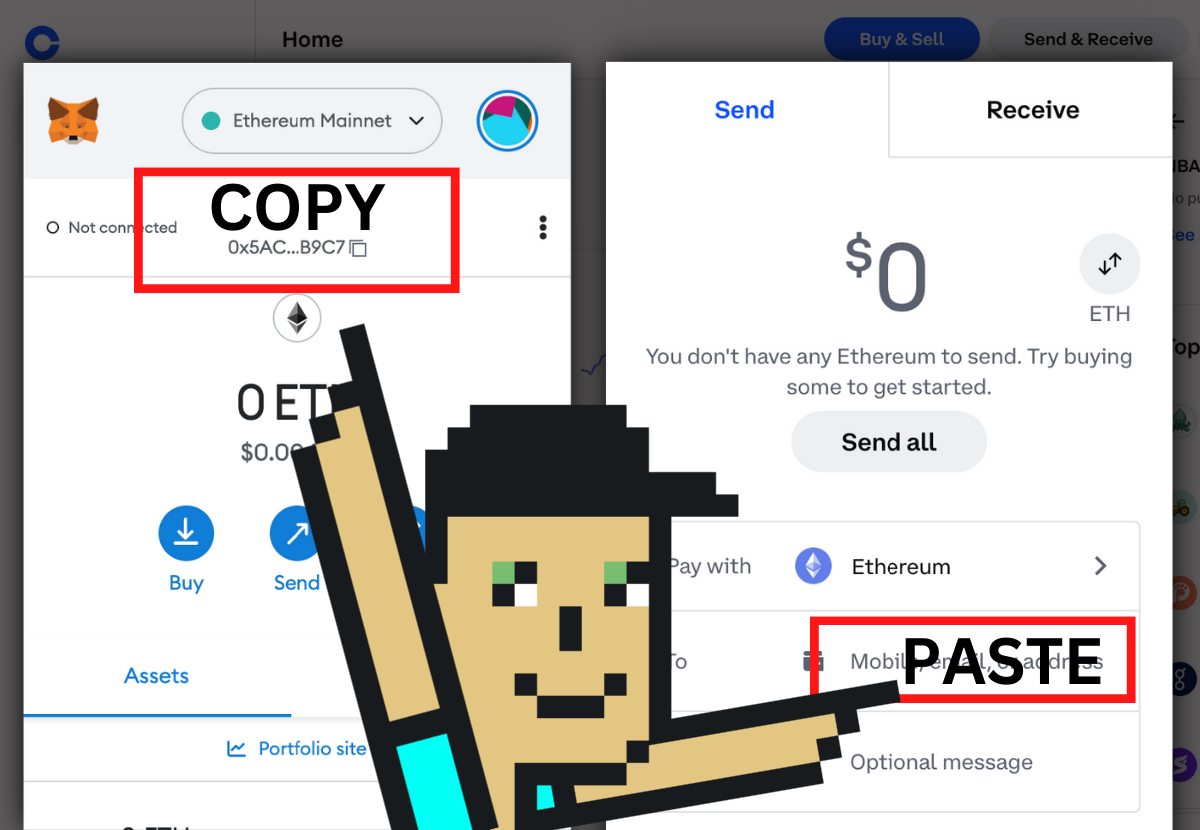
To send your ETH you’ll need the public address of the MetaMask wallet you’re transferring funds to. You can find the MetaMask public address under the Account name towards the top of the wallet profile.
This address is 42 characters long and should begin with “0x”. Simply tap the address to copy it to your clipboard.
Then, paste it into the “To” section from the sending account. You can also choose to add a note if you’re sending the ETH for a specific reason, but it’s not a requirement.
Step 4: Tap Continue/Send Now
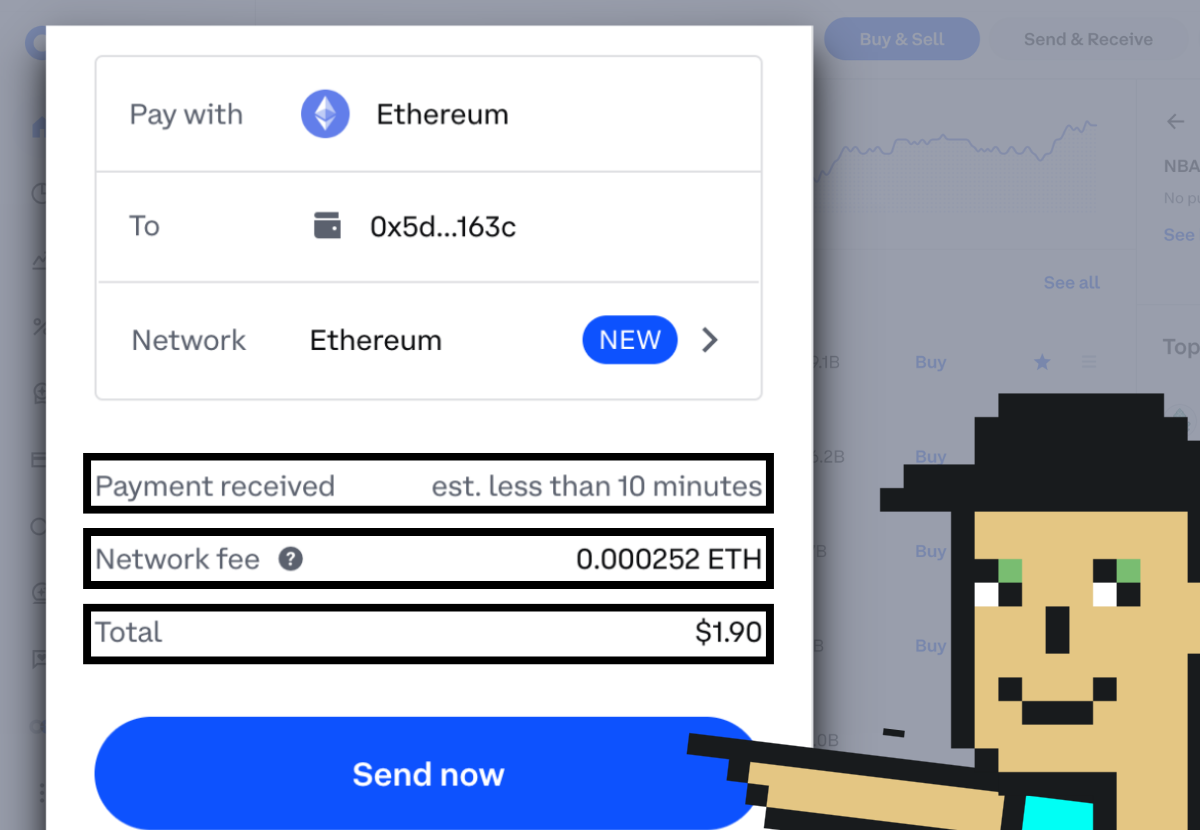
Once you’ve pasted the MetaMask public address into Coinbase tap “Continue” to review your transfer. If everything looks good, tap “Send Now”.
Since sending ETH occurs on the blockchain you will have to pay a gas fee to complete the transfer. This fee is determined by the network and is not set by Coinbase or any other crypto exchange you might be using.
After you submit a transaction it can take more than 10 minutes to appear in MetaMask.
The amount of time it takes greatly depends on the current network congestion. In my experience, funds usually arrive within minutes. If it takes longer don’t panic. It will show up eventually.
Step 5: Verify you’ve received the ETH
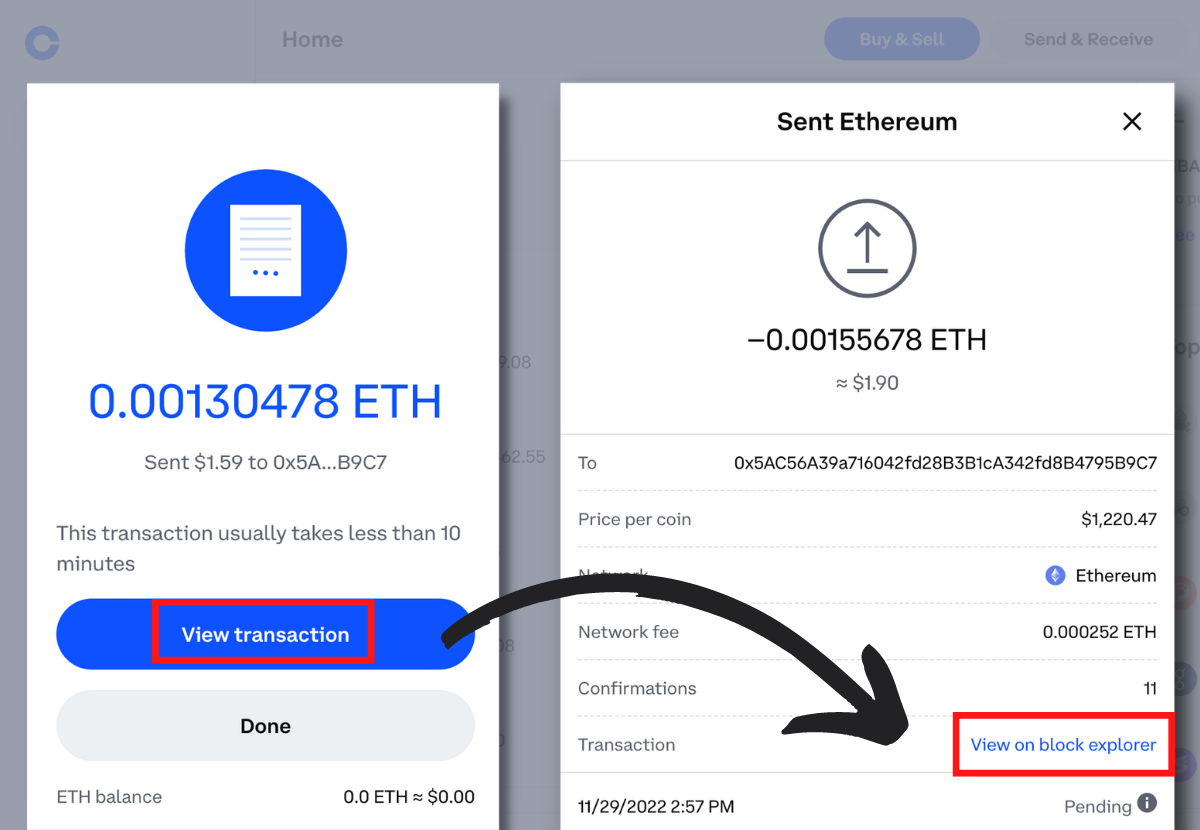
After sending the funds you can verify MetaMask has received the transfer by tapping “View Transaction” a minute after you send the funds. Then, select “View on block explorer”.
This will take you to Etherscan, the Ethereum blockchain explorer, where you can easily confirm the transaction was a success.
If the transaction still says pending just wait a while longer.

You will see a green “Success” on Etherscan once the transaction has gone through. If you see this you know for sure that the funds have been received.
How Much Does it Cost to Send ETH to MetaMask?
The average cost to send ETH to MetaMask is 0.00231 ETH ($0.20 to $0.30 depending on the value of Ethereum). This fee fluctuates depending on the network demand. If the network is busy, expect to pay higher fees. Also, various exchanges have their own set fee for transfers.
The transfer that I executed for this guide only cost me $0.28. However, I’ve paid over $5.00 to transfer funds from Coinbase to my MetaMask wallet when the network was busy.
Remember, the platform you’re sending ETH from doesn’t determine gas fees, it’s solely based on network congestion.
What’s the Cheapest Way to Get ETH to MetaMask?
The cheapest way to get ETH to a MetaMask wallet is by using the Polygon network to send it. By using the Polygon network you can practically eliminate gas fees.
You can also try sending your funds when the Ethereum network isn’t busy and gas fees are at a minimum.
To check the estimated cost of transactions on Ethereum, you can use the Ethereum Gas Tracker. The lower the gwei, the lower your gas fee will be.
If you want to completely avoid using the Ethereum blockchain to send ETH you can use Polygon. This network is more efficient which results in lower transaction fees.
Just know that if you transfer ETH using the Polygon network you won’t be able to use it on the Ethereum network.
For example, if there’s an Ethereum NFT you want to buy you’d need to have ETH on Ethereum, not Polygon. Hence you’d have to bridge it back to Ethereum which means you’d have to pay another fee.
If your main goal is to simply get ETH into MetaMask for safer storage, then Polygon is a good option to reduce transaction costs.
How to Send ETH to MetaMask Using Polygon
1. Add Polygon Network to MetaMask
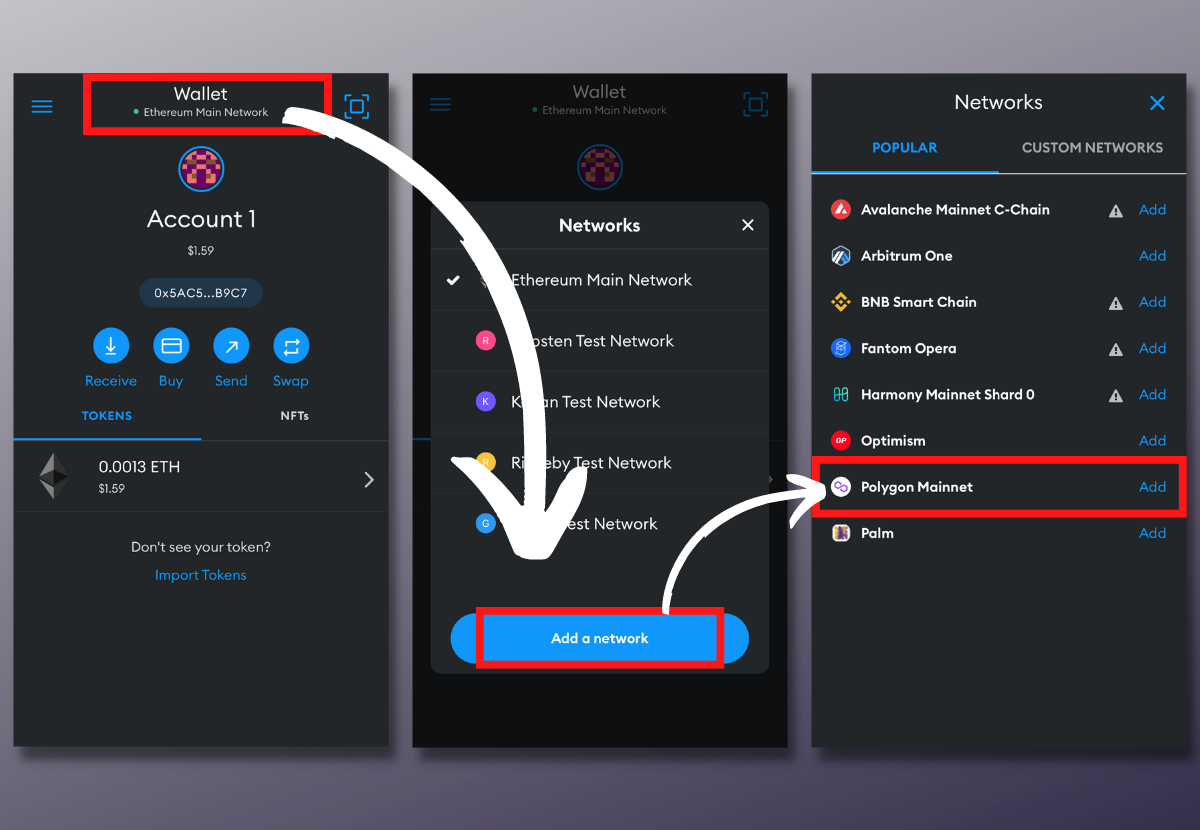
First, you need to change your network in MetaMask to Polygon. To do this tap the “Network” section above your account name. Next tap, “Add a network” and select Polygon.
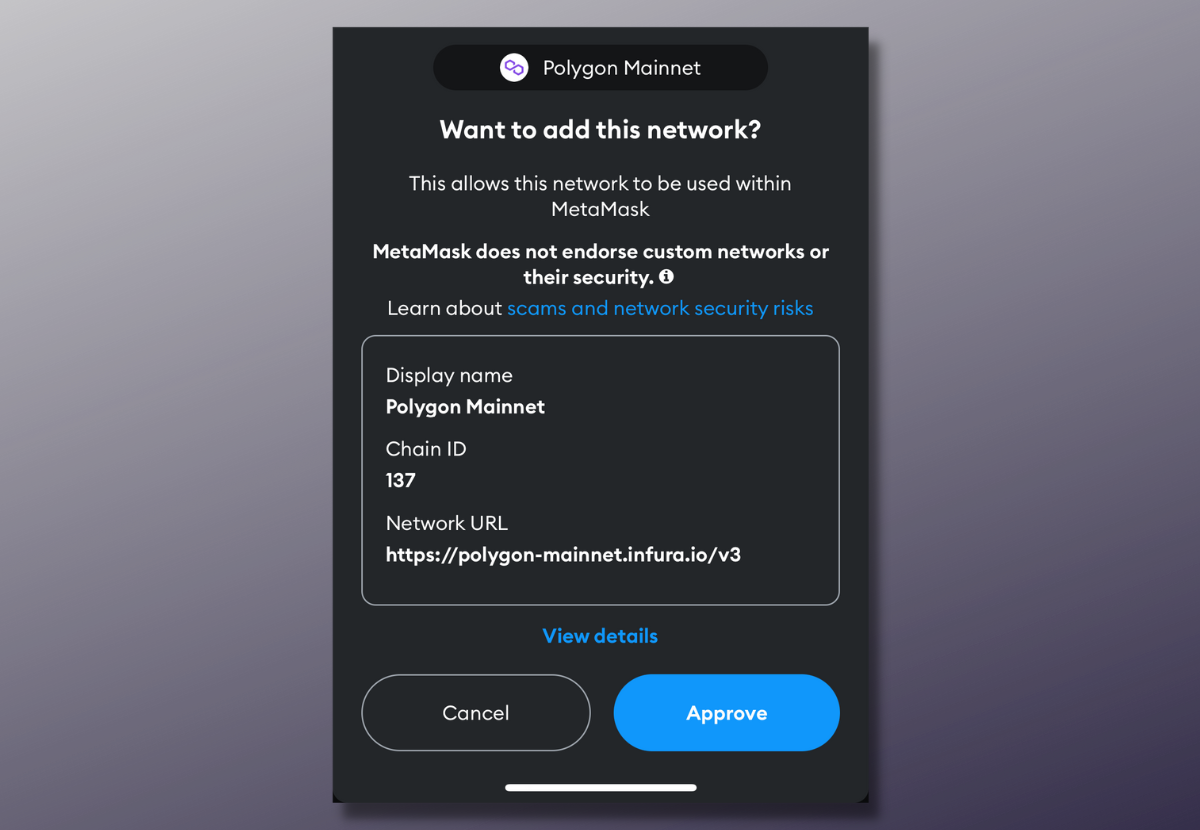
Lastly, you will need to approve adding the network by simply tapping “Approve”.
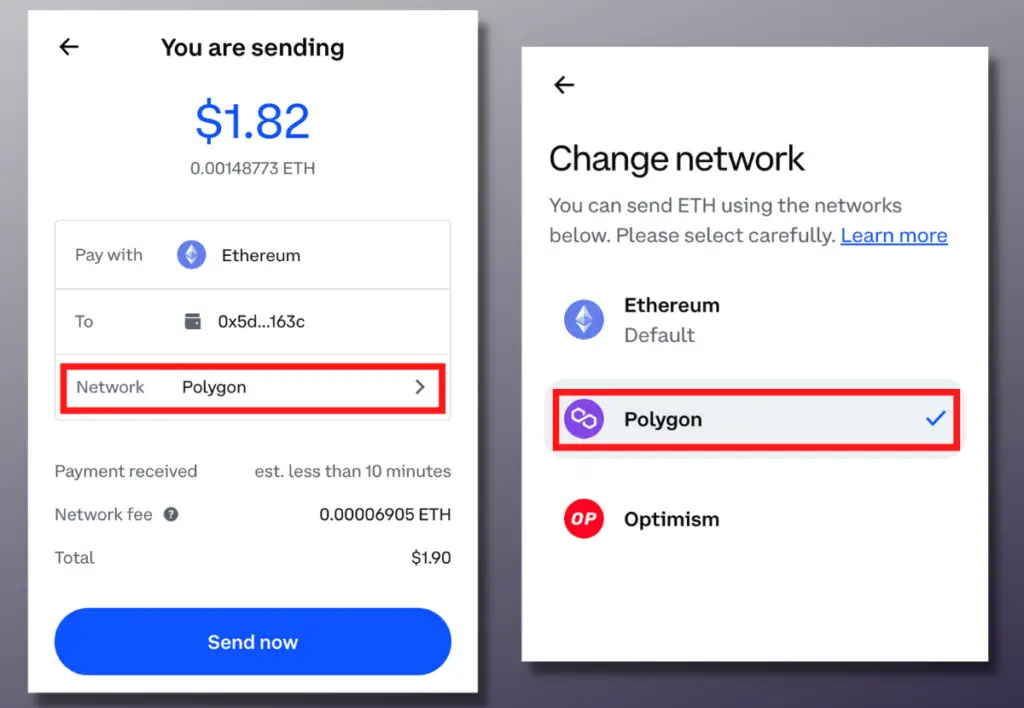
2. Change the sending network to Polygon
You have to change the sending network to Polygon as well.
If you fail to change both the sending and receiving networks to Polygon, you will lose your funds.
That said, there’s no guarantee that the platform you’re sending ETH from will have the option to change the sending network to Polygon.
If that’s the case, you’re out of luck. Your best bet is to wait until the fees on Ethereum come down.
3. Send ETH to MetaMask
Only after you have changed both the sending and receiving networks to Polygon should you move forward with the transaction as usual.
Simply tap “Send now” to complete the transaction.

As you can see in this image, the network fee has been reduced to 0.00006 ETH using the Polygon network—this is less than Ethereum’s 0.0002 ETH fee.
In this instance, the reduced fee is hardly worth it in my opinion as you’re only saving about one cent. But if the Ethereum network was extremely busy the cost difference would be worth it.
Should I Buy ETH on MetaMask or Transfer It?
You should buy ETH directly on MetaMask if you want to avoid the hassle of transferring funds from a crypto exchange to your wallet. You can purchase ETH directly on MetaMask through Coinbase Pay, Transak, MoonPay, and Wyre. Buying ETH on MetaMask does incur fees.
If your goal is to save money, funding your wallet on MetaMask might not be the best option.
Depending on gas fees you may be better off purchasing your ETH on a crypto exchange like Coinbase and transferring it to MetaMask.
Here is a cost breakdown of buying ETH on MetaMask compared to buying it from a crypto exchange and transferring it to MetaMask.
| Payment Method | Amount of ETH Purchased (in $USD) | Fees |
|---|---|---|
| Coinbase Exchange | $100 USD | Coinbase fee: $2.99 Network fee: $0.28 |
| Binance Exchange | $100 USD | Binance fee: $0 Network fee: $0.28 |
| Transak | $100 USD | Transak fee: $3.99 Network fee: $0.28 MetaMask service fee: $1.00 |
| MoonPay | $100 USD | MoonPay fee: $1.99 Network fee: $0.28 |
| Wyre | $100 USD | Wyre fee: $4.00 Network fee: $0.28 |
With the exception of MoonPay, buying ETH directly on MetaMask costs more than buying it from an exchange and transferring it to your wallet.
That means buying Ethereum on an exterior platform and sending it to MetaMask is likely the most cost-effective option. If it’s convenience you’re after then purchasing ETH on MetaMask is a quick method.
All that said, you should never store your ETH on MetaMask as it’s likely to get hacked. MetaMask is not a good storage solution for your assets. Rather, it’s good for making purchases and connecting to dapps.
If your goal is to safely store your crypto, there are more secure wallets for that.