Whether you’re an NFT collector, creator, or investor, it’s important to know how to transfer an NFT to another wallet. After sending a few of my own NFTs between various wallets, I’ve gathered the exact steps you need to take to do the same.
Below, you will learn exactly how to transfer NFTs between various wallets such as MetaMask, Phantom, and Ledger. Plus, you’ll learn exactly how to send NFTs from Opensea to other wallets, along with other important tips. Let’s get into it!
How to Transfer NFTs to Another Wallet
The below steps are intended to work for most wallets including the best hardware wallets. There may be a slight variance, however, depending on the wallet you use. For this example, I will be using Metamask and OpenSea to transfer my NFT to a recipient’s wallet address.
1. Open your wallet to view your NFTs
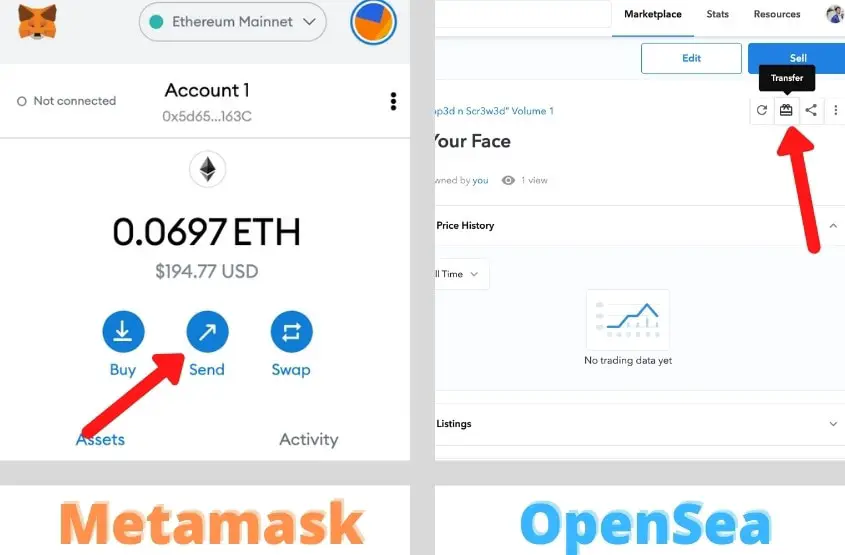
If you are using Metamask, simply open up your app (mobile) or extension (desktop) and select the “Assets” tab. From here you can view your entire NFT collection. If you don’t see the NFT that you want to send, you can go to Opensea and view your NFTs there.
2. Choose the NFT you want to send
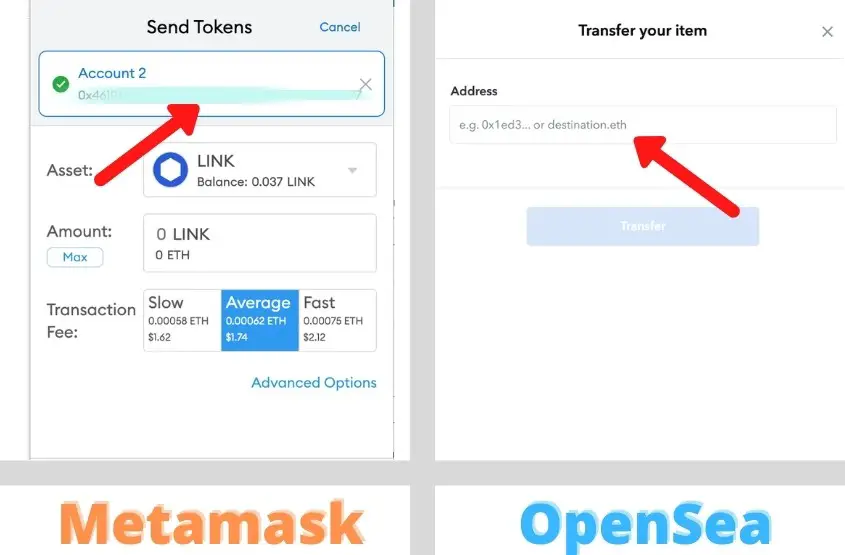
Once you have located the NFT you’d like to transfer, select it to begin the sending process. In your wallet, find the “Send” button. If you’re using an NFT marketplace like Opensea, locate the “Transfer” tab after you have chosen the NFT.

3. Enter the recipient’s public wallet address (or ENS)
Upon selecting the send button, you will be prompted to enter the recipient’s public wallet address or their Ethereum Name Service (ENS).

A proper wallet address will start with “0x”, followed by 40 characters/numbers. Here is an example of a wallet proper public wallet address will look like: 0x5d6535D5DD5d156a7364cFae7C899a7f8A32163E
If your recipient uses an ENS, then their wallet address will be a readable name such as Alex.eth. Simply enter the correct word to transfer an NFT to their wallet.
NOTE: Please verify you have entered the correct recipient address. Once you click Send and after you pay the transaction fee, you will not be able to cancel or retrieve your NFT transfer.
4. Approve the transaction
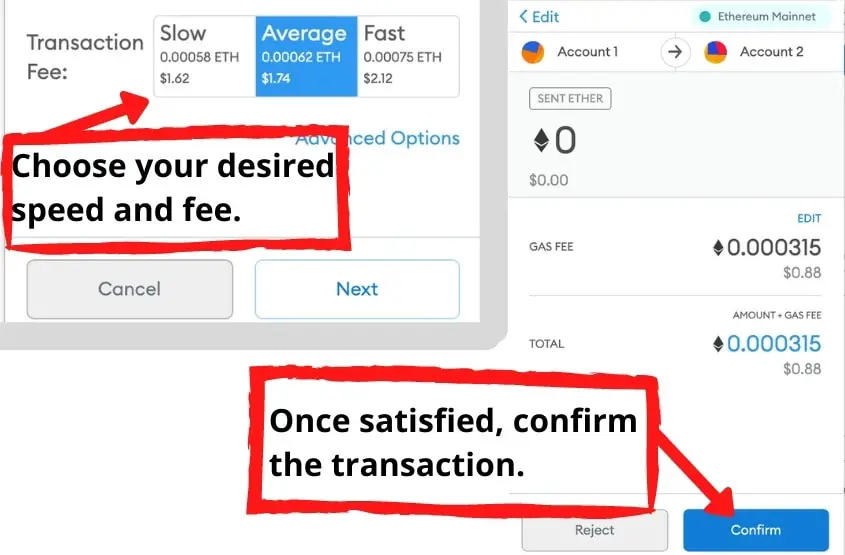
Once you have verified the recipient’s address is correct, you will need to approve the transaction by signing for it using your wallet. The gas fee to transfer an NFT can cost anywhere from $0.50 to $20.00.

When approving the transaction, you will be asked to select your Transaction Fee/Speed.
Although choosing the Slow transaction option is the least expensive, I don’t recommend it. You need to choose either Average or Fast for the best results. If you choose the Slow speed, your transaction may not go through, especially if the network is busy.
Depending on the transaction speed you choose, the transaction will not finish immediately. It can take several minutes for a transfer to complete, so don’t panic if you don’t receive a notification of completion instantly.
5. Verify your transfer
To verify that your transaction is completed successfully, you can use Etherscan (the Ethereum Blockchain Explorer).
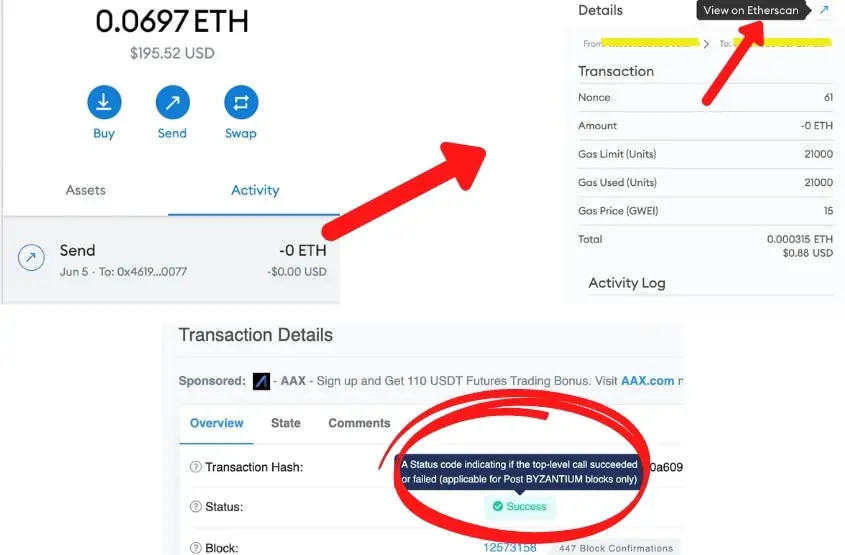
The easiest way to view your most recent transfer is by going to your wallet and viewing the Activity tab.
Here you will find a list of your most recent activity. Pick which transaction you would like to verify and then select “View on Etherscan“. This will take you directly to the Ethereum Blockchain Explorer where you are able to view all of your Transaction Details, such as the current status of your transaction.
If you see a green “Success” for the status, then you know the transaction has been successfully completed.

In my experience, it’s always a good idea to double-check that your transfer has been sent successfully. Also, if you need to check any additional information about your transfer such as timestamp, fees, recipient address, or value, Etherscan conveniently provides all those details for you.
Enjoying this article? Join our community of hundreds of other happy readers to stay ahead on everything Web3. Receive all the best content directly to your inbox. Try it below.
How to Transfer An NFT to a Phantom Wallet
Another popular NFT blockchain is Solana, and the most popular Solana wallet is the Phantom Wallet. So, it only makes sense that we cover how to transfer an NFT to a Phantom Wallet. To send a Solana NFT to a Phantom wallet, follow the steps below.
- Open your Phantom Wallet and go to “NFT Collectibles”.
- Select the NFT you want to send.
- Enter the public wallet address of the recipient’s Phantom Wallet and approve the transfer.
- Confirm the transfer by selecting “Send”, and pay the network fee.
How to Transfer NFTs from Opensea to a Ledger Wallet
A Ledger Hardware Wallet is the most secure wallet for storing your NFTs. However, if you just got a Ledger Wallet and you already own NFTs, then you’ll need to transfer them to your Ledger Wallet manually. Here are the steps to transfer your NFTs from Opensea to your Ledger Wallet.
- Make sure your Ledger Apps are up-to-date (Ethereum, Solana, or whichever blockchain your NFT is stored on).
- Connect your Ledger Wallet to Ledger Live.
- Go to the “Recieve” tab in Ledger Live.
- Copy your Ledger Wallet public wallet address.
- Sign in to Opensea and select the NFT you want to transfer.
- Input your Ledger Wallet public address into the recipient section and hit “Send”.
How to Transfer an NFT to MetaMask from Binance
Although Binance isn’t the most popular NFT blockchain, it’s still useful to know how to transfer a BNB NFT to your MetaMask Wallet. Follow the steps below.
- Sign in to your Binance NFT account via the User Center.
- Select the NFT to transfer. Use the token ID of the NFT if you want to transfer multiple NFTs from one collection.
- Review the transfer and pay the transfer fee. This fee varies depending on network congestion.
- Input the MetaMask wallet address and click “Send”.
How Much Does it Cost to Transfer an NFT?
The cost to transfer a single NFT ranges from $0.50 to more than $15.00. This fee (gas fee) is determined by the current demand on the network. The busier it is, the more it will cost to complete a transaction. For cheaper fees, transfer your NFT late at night or early in the morning.
The difference in price between Slow, Average, and Fast transactions is not significant. I’ve seen the Fast option cost anywhere from $1.00 to $50.00 more than the slow. If you ask me, paying more for the Fast option is well worth it.
If you cheap out and select Slow, you risk your transaction not going through, plus you still have to pay the gas fee. That’s why it’s always best to choose Fast when transferring an NFT.
How Long Does it Take to Transfer an NFT?
Transferring an NFT takes 15 seconds to over 30 minutes. If you choose the Fast option, your transfer is generally completed in seconds. The Average option can take 30 seconds to one minute, and the Slow option may take over 30 minutes. In some cases, the Slow transfer may not be successful at all.
Moreover, the rate at which your transaction is successful depends on how busy the blockchain is at the time of the transfer.
Expect it to take longer if the network is busy. Likewise, if you transact late at night or very early in the morning when fewer people are active, transactions will be processed quicker and for less money.
Tips to Transfer Your NFT Safely
When I transferred my first NFT, I couldn’t help but wonder how safe transferring it to someone else actually was. Luckily, I discovered that transferring an NFT is extremely safe. That being said, there are a few things you need to be aware of to ensure you’re sending your NFT as safely and securely as possible.
1. Never give out your wallet’s secret phrase
Under no circumstance should you give out your wallet’s 12-24 word secret phrase. This phrase is your main line of defense to ensure that only you have access to your wallet and the assets within.
If someone ever requests your wallet secret phrase, this should be an instant red flag that the person has malicious intent. The only information you need to transfer an NFT is the recipient’s public wallet address.
2. Verify the recipients’ wallet address
Always verify that you are entering the correct receiving address when transferring an NFT to another wallet. If you transfer an NFT to the wrong wallet, there is no way to retrieve it unless the recipient were to send it back to you.
3. Always choose the “Fast” transaction speed
When transferring an NFT, just choose the Fast transition speed. It’s not worth risking losing money to gas fees and having your transfer not go through.
Sure you’ll have to pay a little extra, but the peace of mind of knowing your transaction will be successful is worth it.
4. Don’t send someone an NFT if you are awaiting payment
If you’re sending an NFT to someone and you’re expecting payment in return, it’s a good idea to ensure the buyer has already paid you for the NFT. Always confirm the proper currency and payment amount have been successfully received in your wallet before initiating a transfer.
If you don’t feel comfortable transacting on your own without a middleman, use an NFT marketplace to safely list and sell your NFT.
5. Be aware of common NFT scams
One of the most common NFT scams is the phishing link scam. This scam involves sending someone to a malicious website in hopes that they will interact with it using their wallet. If you sign a transaction on one of these fake sites (such as a transaction to transfer an NFT), hackers can gain full control of your wallet and assets.
From there, the scammer will send your assets to their own wallet, where they quickly liquidate all your assets for a quick profit. Unfortunately, there’s not much you can do if this happens to you.
To avoid this scam, only transact on the best NFT marketplaces or directly with the recipient (wallet-to-wallet). If the receiving end requests that you use a special website to transfer an NFT, don’t do it.

10 thoughts on “How to Transfer NFTs to Another Wallet FAST: Beginner’s Guide”
Comments are closed.